Created by Austin Oltmanns, last modified on Jun 02, 2017
This document will cover what is needed to start development with the Renesas DK-S124 development board, available for purchase at https://www.digikey.com/short/3dbtmm. The primary focus of this guide is to enable anyone to install and configure the software needed to begin development with the DK-S124 board and Renesas Synergy Platform. A basic knowledge of programming concepts and computer use is assumed. Attached below are the user’s manual for the hardware of this board as well as the datasheet for the microcontroller and its user’s manual. These documents will serve as a reference for any details left out of this guide, however it aims to be a standalone guide for Getting Started. Before starting the guide, a brief overview of Renesas and the DK-S124 are given.
Dev-Board User’s Manual: https://www.renesas.com/en-us/doc/products/renesas-synergy/doc/r12um0006eu0100-synergy-dk-s124.pdf
S124 Data Sheet: https://www.renesas.com/en-us/doc/products/renesas-synergy/doc/r01ds0264eu0100_synergy_s124.pdf
S124 User’s Manual: https://www.renesas.com/en-us/doc/products/renesas-synergy/doc/r01um0003eu0120-synergy-s124.pdf
Renesas Overview
Renesas is a Japanese company which was established in 2002 and began operation in 2010. This makes them a fairly new company in the semiconductor industry. Renesas offers several lines of microcontrollers for a range of applications in a variety of architectures. In addition to microcontrollers, Renesas offers several other semiconductor products such as IGBT devices and analogue IC’s. This guide will cover the S124 from their Synergy Platform.
DK-S124 Overview
The chip on the Renesas DK-S124 is an ARM® Cortex®-M0+ architecture from the Renesas Synergy platform. Renesas aims to provide quick development through this platform with their suite of tools, namely the e2 studio IDE which will be covered in depth in this guide. The Devkit includes many useful sensors and interfaces to demonstrate some of the abilities of the platform. Demos and guides for these peripherals will be provided in future guides.
Getting Started with Development
To develop with the Renesas DK-S124, 1 free account and 2 pieces of software are needed. As of writing, this software is only officially supported for Windows 7 or 10 (32 or 64 bit) and is free (this cost is offset by the cost of the development board). Renesas recommends a machine with at least 8gb or RAM and several free GB of storage space (at least 5GB). You will also need a USB 2.0 port for programming the board.
This process can take several hours and requires a few GB to be downloaded. The first piece of software is Renesas’s own version of eclipse, a popular Integrated Development Environment which many companies modify, for use with their product. It is called e2 and can be downloaded from the link below. This piece of software provides an environment which integrates many development tools into one front end. This includes a code editor, debugging and program uploading interface. Be aware you will need administrator privileges on the target machine to install some drivers and software. Step by step instructions for navigating Renesas’s Synergy Gallery website are provided next. Please refrain from plugging the Dev-Board into the computer until after all the software has been installed, Windows may download drivers for the board that are not useful for our purposes.
After installing e2 studio, this guide will cover the installation of the SSP (Synergy Software Package). This software includes a license to create a project for the development board as well as libraries for using the different features of it. Renesas says that the software should be installed in this order, so this is the order they will be installed in this guide.
Finally, after the installation of both software packages, this guide will cover building one of the sample projects, uploading it to the board through the debugger and running the project through the debugger.
![]() There are actually at least two ways to download e2 studio from Renesas. One is through the Renesas Synergy Gallery and the other is through My Renesas, each of which require separate accounts. The only way to download the SSP requires a Renesas Synergy Gallery account so this guide will cover this method. Keep in mind though, that other software from Renesas requires a My Renesas account, such as their utility to flash programs to the S124 via the USB device port rather than through the debugger and some example code. This guide only requires a Renesas Synergy Gallery account but these two options can cause confusion if you are searching for the software yourself rather than using the links provided in this guide.
There are actually at least two ways to download e2 studio from Renesas. One is through the Renesas Synergy Gallery and the other is through My Renesas, each of which require separate accounts. The only way to download the SSP requires a Renesas Synergy Gallery account so this guide will cover this method. Keep in mind though, that other software from Renesas requires a My Renesas account, such as their utility to flash programs to the S124 via the USB device port rather than through the debugger and some example code. This guide only requires a Renesas Synergy Gallery account but these two options can cause confusion if you are searching for the software yourself rather than using the links provided in this guide.
Installation of e2 studio
Downloading the installer
As soon as you arrive at the Synergy Gallery, you will be asked to login or register. Assuming you have no account, you will need to register for one. Renesas has provided two links to do just that. Click your favorite one, and you will be directed to the sign-up page.

The sign-up page is a moderately long form which will ask for name, organization, address, etc. Renesas appears to do very little checking of the information entered, but of course it is recommended to fill out the form accurately and completely. Conveniently, marketing emails appear to be opt-in rather than opt-out so you will not be bothered if you enter your favorite email.
Once you have created an account, you will be directed back to the login page. Login with the credentials you have just created and you will be at the landing page. From here you may mouse over the Development Tools section on the banner at the top of the webpage and select “e2 studio ISDE”.

Next you may click either Download or Download Details.

And you will be brought to a third download button:

Which will bring up a license agreement which you must accept before the download will begin. Be aware, at the time of writing, this was a 1 GB download.
Running the installer
After the setup file has downloaded, extract it from the .zip and run the installer. Be aware, you may need administrator privileges to install software on your machine.
The installer will ask if you would like to install Renesas e2 studio, click yes to continue and it will begin extracting the files. This can take several minutes. Next, you will be asked again if you wish to install e2 studio, this time by Windows User Account Control, be sure to click yes again.
Now you will be in the install wizard.
![]() It is important to note that any default options should be kept, as they may be required even if listed by the installer as “optional”. Click “Next” to go past the welcome page of the wizard and onto the install location.
It is important to note that any default options should be kept, as they may be required even if listed by the installer as “optional”. Click “Next” to go past the welcome page of the wizard and onto the install location.
It is recommended to keep the default install location if possible, as other Renesas applications may expect it to be installed there. Click “Next” to continue.
Now you will be presented with a list of device families to install components for. This guide will be using the Renesas Synergy line of products, so select that one and click “Next”.

For the purposes of this guide, none of the extra components are required, so you may simply click “Next” if you do not desire any of these.
On the Components section of the install, it is important to leave all of these selected, as they will be used by the Synergy Platform during development. Click “Next”, leaving all options selected.
In Additional Software, leave the most recent GCC ARM Embedded compiler selected, this is required to build the programs. Click “Next” to continue.
View and accept the license agreements. Click the checkbox at the bottom to accept and then press “Next”.
You may choose to not have a start menu group created, but the default option is to have it be created. Click “Next”.
Now to review the components to be installed, your list should look like this one:

The selected components will begin to install; this can again take several minutes. During the installation, you will be asked to allow several devices (4 of them) to install as well as select a language. Then you will be asked to install the GNU Tools for ARM Embedded Processors. Agree to the license agreement and install to the default install location to ensure other software which assumes its location may find it. Once the GNU Tools for ARM Embedded processors has finished, it will present 4 options:

You may deselect the first two if you wish, the readme is useful if you plan on running GCC Tools for ARM from the command line and gccvar.bat will setup a terminal with some variables set for this as well. The third and fourth options should be selected as they will enable other programs to find these tools easier as well as make execution from the command line quicker, but that is not covered in this guide.
The installation of e2 studio is now complete, check the box to launch it and view the release notes if you like.
Running e2 studio for the first time
Those familiar with eclipse will recognize the following window.

For most users and the purposes of this guide, the default location is fine. Additionally, if you do not wish to be asked this question each time, click the checkbox to set this as the default and click “OK”.
Next, e2 will show that there are toolchains available for integration. Select the GGC ARM Embedded boxes and click “Register”. You should receive an information dialog window informing you that the toolchains were integrated successfully. Press “OK” to dismiss this window and launch e2.

You will then be greeted by the e2 welcome page. Take a moment to appreciate the subtle hues present in the background. Then click File>New>Synergy C Project.


You should notice that the next button is unavailable. This is because it is still needed to install the SSP for a license. Close the new project window as well as e2 before proceeding, e2 studio will ask you to confirm if you would like to exit.
Installation of Synergy Software Package
To install the SSP, you must go back to https://synergygallery.renesas.com/ and login to the account you created earlier if you are not already logged in. Once logged in, click “Synergy Software Package” along the top banner.

Once again, click your favorite download button.

And again, press the third download button.

Accept the license agreement and download the 139MB (at time of writing) .zip file. After it has downloaded, extract the installer and run it. As the installer states, be sure that you both have e2 studio installed and that it is not running. Also, note that the SSP install directory must point to the e2 installation directory (as stated by the installer). After ensuring these things, click “Next”.
Agree to the license agreement.
Click “Next” to install both the SSP release pack and its documentation.
Ensure that the install path of the SSP is the same as e2 studio. If you kept the default install location of e2 studio during its installation, you won’t have to make any changes here. Click “Install” to begin installation.
The installer will ask where to install the documentation. The default location is fine, it is C:\Renesas\Synergy.
The installer will finish and you may press “Close” to close it.
You now have enough software to begin programming your new Dev Kit!
Creating, Building, Uploading and Debugging an example program
Creating
Open e2 studio again. If you can’t find it, try pressing the windows key and typing “e2”. If you installed the start menu folder shortcut it should appear. Failing this, you may navigate to the executables directory (default is C:\Renesas\e2_studio\eclipse) and launch e2studio.exe. Consider adding a shortcut somewhere for easy access.
Once e2 studio launches, you should find yourself again at that soothing welcome screen. Now that SSP is installed, a project can be created and built. Navigate to File > New > Synergy C Project as was done before. Enter a name for your project. This guide will use the name “test”. Then, press the “Change license file” link.

Then, press the ellipsis browse button in the License file entry area.

Now, press the “Browse…” button that appears in the dialogue.

The dialogue should open to the correct file. If not, the path should be C:\Renesas\e2_studio\internal\projectgen\arm\Licenses\ and the file SSP_License_Example_EvalLicense_20160629.xml

Click the file to select it and press “Open”, click “OK” to close the Specify Synergy License Dialogue and then press “OK” one more time to close the Preferences window that was brought up by the “Change license file” link. Now you may press “Next” to continue. This should be the only time you need to select the license file upon generation of a new Synergy C Project.
The next set of options will allow the selection of the S124 Dev Kit.

Choose the S124 DK from the Board drop down list. Next the Device will be chosen, ensure that this is the same as what is on your Dev Kit. For this guide, the R7FS124773A01CFM will be used.


Then, the wizard will present 3 options for you to choose from. For this guide, Blinky will be used.

Click finish to create the sample project. E2 studio may ask if you would like to change perspective to the Synergy Configuration perspective. For those unfamiliar with eclipse, a perspective is how the windows inside the editor are arranged and this dialogue is asking if you would like to change to the perspective to something useful for editing. Click “Yes” to finish loading the sample project.
If nothing changes after a while and you still see only the welcome screen, look for a refresh perspective button in the upper left or try changing the perspective from Window>Perspective>Other… and selecting either C/C++ (default) or “Synergy Configuration” from the top menu bar under the title of the window. If this still does not work, try restarting e2 studio by closing it and reopening it. While making this guide, this issue only appeared once and was difficult to be reproduced so hopefully it does not happen to you.
Now that the project is opened, feel free to close any windows in the editor you don’t like. The important ones to have are Project Explorer, Problems and Console. If these windows are not present they can be found in Window>Show View>Project Explorer or by clicking the Other… option in that same drop down. Feel free to explore other views/windows as well, each developer has their own preferences.


Click the down arrow on the “src” directory in Project Explorer to expand and view the source files for the sample project. Expand synergy_gen and also double click hal_entry.c to view it in the editor.

This hal_entry.c file is where the user application code goes when using the Synergy Software Package. HAL is an acronym for Hardware Abstraction Layer and this layer is provided to ease the learning curve of the developer when switching to a new platform. If you are interested in the details of its implementation, the source files in the synergy_gen directory encapsulate some of the functionality of this layer. In addition to the synergy_gen directory, you may notice a synergy directory, a ssp directory, and a synergy_cfg directory. Each of these folders contains more setup code for this specific board and the synergy platform. For the purposes of this guide however, only the hal_entry.c file need be examined.
Inside the hal_entry.c you will notice some setup code followed by an infinite loop. This loop simply toggles the LEDs and delays the microcontroller. To see this code in action, the project must be built and uploaded.
Building
Press the hammer icon to build the project in its debug configuration (the default option).

The project should build in a short amount of time, and now is ready to be uploaded through the debugger.
Uploading
![]() Before plugging in the Dev Kit to the computer, follow the instructions in the Quick Start Guide provided by Renesas that came with your board to ensure all peripherals are plugged in correctly. Most importantly, ensure that jumper J17 is left open (i.e. the two pins are not connected) and if you have the display plugged into the board that it is facing up and all its pins are aligned and inserted fully into the connection. Finally double check that J8 is set for 3.3 Volts and not 5 (the middle pin should be connected to the pin closest to the PMOD connection).
Before plugging in the Dev Kit to the computer, follow the instructions in the Quick Start Guide provided by Renesas that came with your board to ensure all peripherals are plugged in correctly. Most importantly, ensure that jumper J17 is left open (i.e. the two pins are not connected) and if you have the display plugged into the board that it is facing up and all its pins are aligned and inserted fully into the connection. Finally double check that J8 is set for 3.3 Volts and not 5 (the middle pin should be connected to the pin closest to the PMOD connection).

![]() Please be aware that in the following steps any program on the board will be erased, so if you have interest in viewing the demo program that ships with the board please do so now. Of course, this program is available for download again from the downloads section of https://www.renesas.com/en-us/products/synergy/microcontrollers/s1-series.html as well as other example code. Note: this will require creation of a My Renesas account (not covered in this guide, but very similar to creation of the Synergy Gallery Account detailed earlier).
Please be aware that in the following steps any program on the board will be erased, so if you have interest in viewing the demo program that ships with the board please do so now. Of course, this program is available for download again from the downloads section of https://www.renesas.com/en-us/products/synergy/microcontrollers/s1-series.html as well as other example code. Note: this will require creation of a My Renesas account (not covered in this guide, but very similar to creation of the Synergy Gallery Account detailed earlier).
After these important details have been attended to properly, it is time to plug the board in. Use the J-Link OB USB port on the side of the board next to the battery holder. If you try using the other port, the board will not receive power and nothing interesting will happen.
After the board has been plugged in, allow Windows to settle and install drivers before proceeding to the next step.
To upload the project using the debugger, click the arrow next to the small bug icon at the top of the e2 studio window. It is only necessary to click the arrow this first time, any subsequent debugging uploads will only require pressing the bug. From the drop down menu, select “Debug Configurations…”. This will bring up the Debug Configurations window.

On the left side of the window, you will see a list of debugging configurations. Click the drop down arrow next to Renesas GDB Hardware and select “test Debug”. Note: if you named your project something other than “test” that change will be reflected here. To upload the program, press the “Debug” button at the bottom of the window.

If all goes well, the debugger should launch and ask if you would like to change perspectives to the debug perspective. Click “yes” and after a quick digression this guide will cover stepping through the program.
Issues and troubleshooting
If all does not go well, you will receive a slightly cryptic error like the one below.
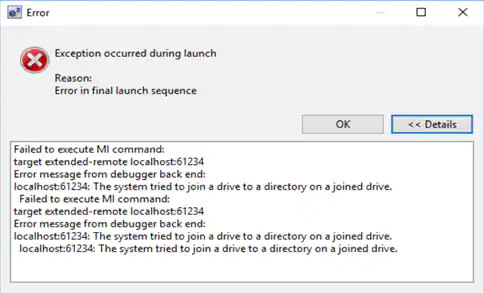
The error text reads:
Error in final launch sequence
Failed to execute MI command:
target extended-remote localhost:61234
Error message from debugger back end:
localhost:61234: The system tried to join a drive to a directory on a joined drive.
    Failed to execute MI command:target extended-remote localhost:61234
Error message from debugger back end:
localhost:61234: The system tried to join a drive to a directory on a joined drive.
    localhost:61234: The system tried to join a drive to a directory on a joined drive.
During construction of this guide, the guide-maker spent about 2 hours on an emotional roller coaster trying to figure out the root cause of this issue and how to solve it. It appears that this issue is a bug either in GDB (the debugging software), the e2 studio software and how it starts GDB from the configuration or maybe even some Windows security settings. The issue is difficult to reproduce, and unfortunately the “fix” was a combination of unplugging and re-plugging the dev board into the computer, making new debug configurations and triple checking the debug configuration settings. A brief overview of the settings used and the process for creating a new debug configuration is given below.
With the “Renesas GDB Hardware Debugger” text selected, press the page with a yellow star button to create a new configuration. For the sake of triple checking settings and trying to force a working configuration, select “Debug” as the “Build configuration”.

Next, go to the “Debugger” tab and ensure that your settings match these: Debug hardware is set to J-Link ARM, Target Device is set to R7F212477 and that “Autostart local GDB server” is selected.
![]() You may be tempted to “Enable verbose mode” under the Debugger settings to get a better clue about what is going on; however, this seems to mess up how the options are passed to GDB and break it. Perhaps this issue is related and points towards a bad configuration being passed to GDB if you are experiencing this issue.
You may be tempted to “Enable verbose mode” under the Debugger settings to get a better clue about what is going on; however, this seems to mess up how the options are passed to GDB and break it. Perhaps this issue is related and points towards a bad configuration being passed to GDB if you are experiencing this issue.

The startup settings should remain unchanged.

Under common settings, make sure “Allocate console” is checked. There are posts from some people with the same issue on different platforms who found that the issue was caused by this box not being checked.

The source settings should also remain unchanged.

Multiple vendors seem to have this issue in their software, including STMicroelectronics and NXP. Both of these companies have also spun their own version of eclipse and are using GDB for their platform. Renesas also has this issue with other products in their line and it seems to be exclusive to Windows. A link to these issues is provided below. Hopefully, by unplugging and re-plugging, restarting e2 studio, making new configurations and persistence you are able to get rid of this spooky bug.
STM issue: http://www.openstm32.org/tiki-view_forum_thread.php?comments_parentId=210&display=print
NXP issue: localhost:3333: The system tried to join a drive t... - NXP Community
Renesas issue: | Renesas Electronics Corporation
Debugging
Assuming you were able to get through the above process, or maybe you were lucky enough to not run into it, there will soon be 3 blinking lights on your dev-board. They have not started to blick yet, as program execution has been halted right before the entry into hal_entry.c code. Congratulations! Getting to this point is arguably the nastiest part of setting up any new platform. Now it is time to dive into the powerful debugging features Renesas has included. An outline of the new perspective that you switched to follows.

First thing to notice is the workspace switcher that is now on the upper right of the interface. These buttons allow you to switch between the C/C++ perspective (useful for editing) and this, the Debug perspective. Next, in the upper middle of the interface are the actual debugging buttons. These include (in order, left to right) “Skip all breakpoints”, “Resume”, “Suspend”, “Terminate”, “Disconnect”, “Step into”, “Step over”, “Step return”, and “Instruction stepping mode”.
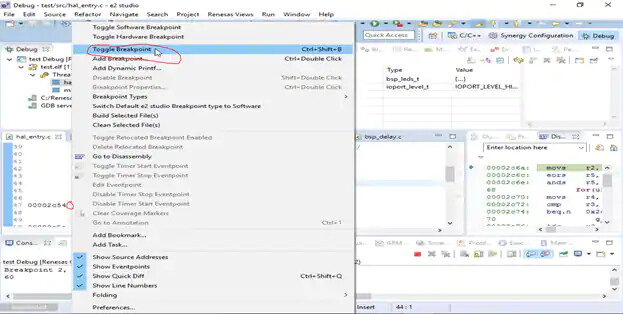
A quick definition: A breakpoint is something you may set from the IDE (e2 studio) that tells the debugger to halt execution at this point. By default, one is set at “main” which in this case means that the program halts right before the code in the hal_entry.c file is run. You may toggle additional break points by right clicking on the margin next to a line of code and selecting “Toggle breakpoint”.
Skip all breakpoints, as its name implies, will allow you to skip any breakpoints you have placed in your code. This is useful if you would simply like to see your code run without stopping. As soon as the debugger was ran, it executed the program up until the first breakpoint at main. If you simply wish to see the lights blink at this point, you may press “Resume” to continue execution of your code.
To explore a few features of the debugger, press the “Suspend” button to halt the execution of the code. Place a breakpoint on line 74 on hal_entry.c. Press “Resume” to run the program until this point.
Now that the program execution is halted here, try pressing “Step into” to step into the execution of this function. This will enter the execution of this function, press “Step into” a few more times to keep stepping through this function. This function calls many subroutines. Press “Step return” to execute until the current function returns. You may also use “Step over” to execute the next function through its return. See if you can get execution to stop right before the for loop on line 68 and Instruction stepping mode will be covered next.

Notice how the disassembly is given on the right side of the screen, you may cross reference the C code instruction with the assembly instruction by its instruction address, circled in the image above. Also notice the variables panel in the top right. This panel is very useful for debugging, as you may view the value of the variables in the code as it executes.
Press the “Instruction stepping mode” button to toggle instruction stepping mode. Now you may use “Step into”, “Step over” and “Step return” to step through the individual assembly commands.
When you feel satisfied from stepping through individual assembly commands, you may press the “instruction stepping mode button” again to exit instruction stepping mode. Then press “Skip all breakpoints” followed by “Resume” to view the lights blink on the board.
To stop debugging, you may press the “Terminate” button to exit the debugger. The program will still be running on the dev-kit, but it is safe to unplug it if you choose.
This concludes this getting started guide. This guide covered the installation of Renesas’s e2 studio and Synergy Software Platform, building and uploading a program to the dev-kit and an overview of the debugger. The next guides will cover using some of the peripherals of the board and how to download example code from Renesas.
Questions/Comments
Any questions or comments please go to Digi-Key’s TechForum