The simplest way to create a new project in STM32CubeIDE is by using the STM32 project wizard. By default, this tool sets up an STM32Cube project which includes several driver files, system files, and a .ioc file (i.e. code generation settings configurable with the integrated STM32CubeMX editor). If for some reason the developer wishes to start from a blank canvas, they can instead create an empty project which includes only the files necessary to get the MCU up and running. These includes the linker script, startup code, and a bare-bones main.c file.
While it is incredibly simple to create an empty project in STM32CubeIDE, it is quite difficult to produce any quality code within it unless some additional drivers are added. At the bare minimum, the CMSIS header files corresponding to the target device should be downloaded and included in the project to provide register definitions for the device. In the following procedure, the STM32L152RE MCU is selected as the target MCU for demonstration purposes. However, this procedure will work for any member of the STM32 family.
Create an Empty Project
-
In STM32CubeIDE, select File > New > STM32 Project.
-
Use the Target Selector to select the target STM32 device. In this example, the “STM32L152RE” device was selected from the list (it can easily be found using the search bar in the MCU/MPU Selector tab). Click Next.
-
Give the project a name and change the Targeted Project Type to Empty, as shown in Figure 1. Click Finish.

Add the CMSIS Header Files
Technically, this step is optional as the project will compile just fine at this point. However, without any additional drivers and/or register definitions, the programmer would be limited to register level programming using hard-coded addresses like so:
/* Set output pin PA5 high */
*((uint32_t*)0x40020014) |= (1 << 5);
Obviously, this will not yield quality code as it is not understandable, portable, or maintainable. While the programmer could manually create definitions for every register address and bit field, these are already provided in the CMSIS header files available from the STM32Cube MCU packages. Including these header files in the project allows register level code to be written as follows:
/* Set output pin PA5 high */
GPIOA->ODR |= GPIO_ODR_ODR_5;
NOTE: For each STM32 MCU series (STM32F4, STM32G0, STM32L1, etc.), a corresponding MCU package is available for download from both ST’s website and the STMicroelectronics GitHub repository.
Such code strengthens each of the aforementioned quality attributes without sacrificing performance efficiency. Furthermore, including the CMSIS header files allows elements of the STM32Cube LL and/or HAL drivers to be included in the project as well, because those higher-level abstraction layers are built on the CMSIS definitions.
The following procedure continues to use the STM32L152RE device as an example. Obviously, if a different target device was selected, any directories or files mentioned below containing the text “STM32L1” are actually referring to the corresponding resources for your target device.
-
Start by downloading the STM32Cube firmware package for the project’s target MCU either from ST’s website or from the STMicroelectronics GitHub repository. Extract or clone the package to a suitable directory. For this example, the
STM32Cube_FW_L1_V1.10.3directory was copied to theC:\Users\Mattdirectory. -
In STM32CubeIDE, right-click on the name of the project in the Project Explorer and choose Import.
-
Choose the File System import wizard under the General category. Click Next.
-
Populate the From directory text box with the path to extracted firmware package. In this case, the path is
C:\Users\Matt\STM32Cube_FW_L1_V1.10.3, as shown in Figure 2. -
Use the file browsing windows to select the CMSIS files to import. Check the boxes next to the
STM32Cube_FW_L1_V1.10.3/Drivers/CMSIS/Core/IncludeandSTM32Cube_FW_L1_V1.10.3/Drivers/CMSIS/Device/ST/STM32L1xx/Includedirectories. The window should appear as shown in Figure 2. Click Finish.

NOTE: At this point, it would also be a good idea to copy and paste the STM32Cube_FW_L1_V1.10.3/Drivers/CMSIS/Device/ST/STM32L1xx/Source/Templates/system_stm32l1xx.c file somewhere in project as well. While not strictly required for the STM32L152RE device, devices that utilize a hardware FPU will require its definition of SystemInit(). The HAL drivers rely on this file as well.
- Add the imported directories to the project include paths list. In the Project Explorer, right-click on each of the
Includefolders and select Add/remove include path… as shown in Figure 3. In the pop-up window, make sure both the Debug and Release configurations are checked and click OK.

Figure 3: Adding the
Drivers/CMSIS/Core/Include and Drivers/CMSIS/Device/ST/STM32L1xx/Include directories to the project include paths list
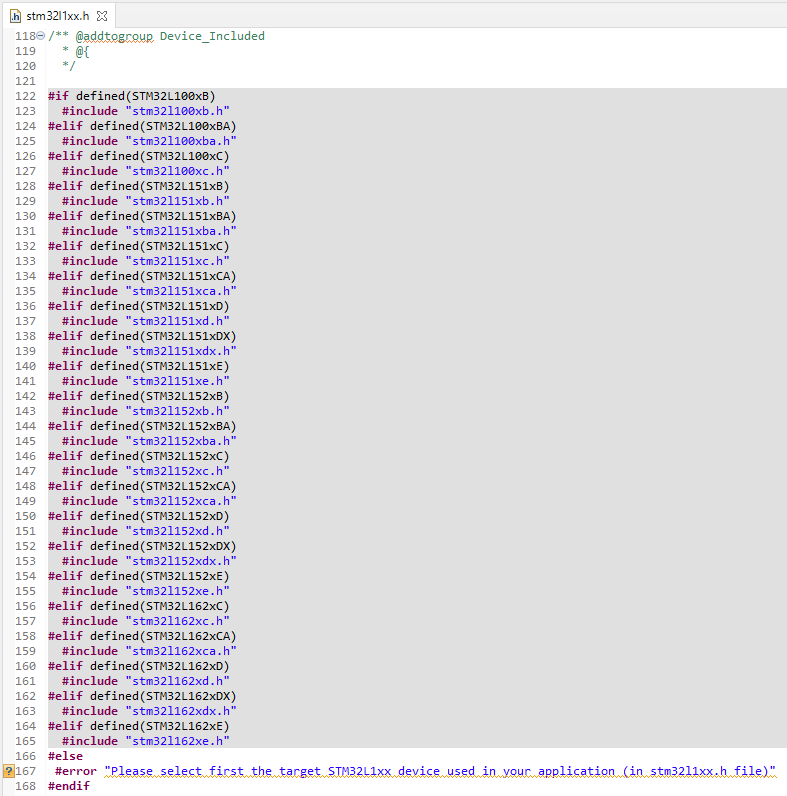
- Use the Project Explorer to expand the
Drivers/CMSIS/Device/ST/STM32L1xx/Includedirectory. Double click the file namedstm32l1xx.hto open it. Scroll down to locate the list of target devices (Figure 4) and determine which one corresponds to the project’s target device. In this case, it is the “STM32L152xE” device.
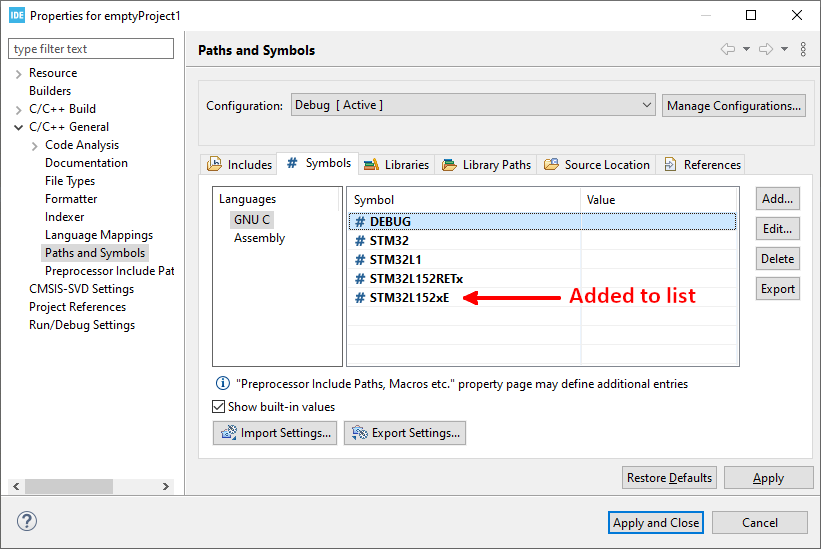
Add this device definition to the project symbols list. In the Project Explorer, right-click on the project name and choose Properties. On the left-hand side of the Properties window, navigate to C/C++ General > Paths and Symbols. In the Symbols tab, click Add and enter the definition (i.e. STM32L152xE) in the Name text box. Click OK and verify that the symbol now appears in the list as shown in Figure 5. Click Apply and Close.
- Finally, add
#include "stm32l1xx.h"to the source file(s) that needs to use the register definitions and start coding!