Description
This project sets up a STM32WL55 Nucleo board as a LoRa sensor development node, adds the sensor node to a ChirpStack based private LoRaWAN network, and uses HTTP integration and a custom data collector to pass sensor data into Machinechat’s JEDI Pro IoT platform. The LoRa sensor uses ST’s STM32WL55 Nucleo board and IKS01A3 MEMs inertial and environmental Nucleo expansion board. Seeed’s IP67 rated industrial LoRaWAN gateway is used to forward the LoRa sensor packets to a private ChirpStack LoRaWAN network server running on a Seeed Odyssey Blue mini PC (with Ubuntu linux installed). Machinechat’s JEDI Pro IoT platform runs on the same Odyssey Blue mini PC.

Hardware
- Seeed Odyssey Blue x86 Mini PC
Quad Core Celeron J4105 Mini PC with 128GB external SSD note: this needs to be updated with new part number that is available - Seeed SenseCAP Outdoor Gateway - LoRaWAN US915MHz
SenseCAP LoRaWAN Gateway is based on LoRaWAN® protocol, applicable for low-power, long-distance environmental data collection and monitoring. - ST NUCLEO-WL55JC1
STM32WL55JCI7U Nucleo-64 series ARM® Cortex®-M0+, ARM® Cortex®-M4 MCU 32-Bit Embedded Evaluation Board - ST X-NUCLEO-IKS01A3
HTS221, LIS2DW12, LIS2MDL, LPS22HH, LSM6DO, STTS751 Accelerometer, Gyroscope, Humidity, Magnetometer, Pressure, Temperature Sensor Nucleo Platform Evaluation Expansion Board
Software
- JEDI Pro or JEDI Pro SSE
Adaptable software for IoT data collection, visualization, monitoring and data storage that can be integrated into IoT solutions. Capabilities include: collect data from sensors, devices and machines; build intuitive real-time and historical data and system view dashboards; create rules to monitor and respond to data conditions automatically; receive alert notifications by email and SMS. JEDI Pro SSE is the Seeed Studio Edition version of JEDI Pro that adds a Data Collector for Seeed’s line of SenseCAP LoRaWAN sensors - ChirpStack
The ChirpStack open-source LoRaWAN Network Server stack provides open-source components for LoRaWAN networks. The modular architecture makes it possible to integrate within existing infrastructures. - ST Tools & Software
ST tools STM32CubeMX, STM32CubeProgrammer, STM32CubeIDE and STM32CubeWL need to be installed for this project. Installation instructions and information on the ST tools are located in the “STM32WL LoRaWAN Workshop Installation Guide” pdf document that can be downloaded from the “Materials” section of the “LoRaWAN® Hands-on Development with the STM32WL Wireless System-on-Chip MCU” eLearning course available on https://community.st.com/s/learning-catalogs in the STM32 Wireless LPWAN section of “Academy”. - Tera Term
Tera Term is open source free software terminal emulator supporting UTF-8 protocol.
Background
This post is a follow-on project that builds on the related TechForum post Set up a private LoRaWAN Sensor Network with Machinechat and Seeed SenseCAP which details setting up a private LoRaWAN IoT sensor network using off the shelf hardware and software available at Digi-Key. Software used in the related project included Machinechat’s JEDI Pro applications software and ChirpStack’s LoRaWAN network server application. Hardware used in the project included a Seeed Odyssey x86 Mini PC and SenseCAP outdoor LoRaWAN gateway. For this post a ST STM32WL55 Nucleo board and ST IKS01A3 sensor board are configured as a Lora sensor and added to the existing private LoRaWAN network.
Set up the STM32WL55 Nucleo LoRaWAN sensor node firmware
(note: The STM32WL55 based LoRaWAN sensor node used in this project is based on ST’s STM32 LPWAN workshop and closely follows related steps and procedures documented in the “STM32WL Workshop slide deckRev2.pdf” workshop material available for download. The ST workshop demo utilized “The Things Network (TTN)” for the LoRaWAN network server but the firmware used in the STM32WL55 also works with the ChirpStack LoRaWAN network server used in this project. The Things Network is not used in this project but the LoRaWAN concepts are very similar.)
1 - Go to the “Academy” section of ST Community and login. Select “General Purpose Microcontrollers” and go to the “STM32 Wireless LPWAN” category. Select the “LoRaWAN® Hands-on Development with the STM32WL Wireless System-on-Chip MCU” eLearning course and download “STM32WL Workshop Slide Deck Rev2.pdf” from the Materials section for reference in below steps.
2 - Download the STM32CubeWL package. Follow steps as described starting on slide 81 of “STM32WL Workshop slide deckRev2.pdf”.
3 - Review the installed STM32CubeWL code on slide 126 of “STM32WL Workshop slide deckRev2.pdf”.
4 - Setup LoRaWAN_End_Node Firmware - Set Dev EUI. Modify “se-identity.h” as described on slides 153-154 of “STM32WL Workshop slide deckRev2.pdf”. (note: “se-identity.h” is located where STMCubeWL package installed, for example C:\STMicro\stm32cubewl_v1-2-0_v1.2.0\STM32Cube_FW_WL_V1.2.0\Projects\NUCLEO-WL55JC\Applications\LoRaWAN\LoRaWAN_End_Node\LoRaWAN\App )
5 - Setup LoRaWAN_End_Node Firmware - Set Region. Modify “lora_app.h” described on slide 155 of “STM32WL Workshop slide deckRev2.pdf”. (note: “lora_app.h” is located where STMCubeWL package installed, for example C:\STMicro\stm32cubewl_v1-2-0_v1.2.0\STM32Cube_FW_WL_V1.2.0\Projects\NUCLEO-WL55JC\Applications\LoRaWAN\LoRaWAN_End_Node\LoRaWAN\App )
6 - Setup LoRaWAN_End_Node Firmware - Enable Debugger. Modify “sys_conf.h" described on slide 156 of “STM32WL Workshop slide deckRev2.pdf”. (note: “sys_conf.h” is located where STMCubeWL package installed, for example C:\STMicro\stm32cubewl_v1-2-0_v1.2.0\STM32Cube_FW_WL_V1.2.0\Projects\NUCLEO-WL55JC\Applications\LoRaWAN\LoRaWAN_End_Node\Core\Inc )
7 - Build and load the program on the NUCLEO-WL55JC1 Nucleo board - Build Firmware. Start STMCubeIDE and navigate to “LoRaWAN_End_Node” project using Project Explorer. Follow instructions to build project as described on slide 157 of “STM32WL Workshop slide deckRev2.pdf”.
8 - Connect the NUCLEO-WL55JC1 board to your PC. Follow instructions on slide 158 of “STM32WL Workshop slide deckRev2.pdf”.
9 - Build and load the program on the NUCLEO-WL55JC1 Nucleo board - Debug. Follow instructions to build project and download firmware as described on slides 159-160 of “STM32WL Workshop slide deckRev2.pdf”.
10 - Add the IKS01A3 Sensor Shield to the NUCLEO-WL55JC1 Nucleo board and build and load the firmware. Follow instructions to build project and download firmware as described on slides 193-211 of “STM32WL Workshop slide deckRev2.pdf”.
Add the STM32WL55 Nucleo LoRaWAN sensor node to the ChirpStack LoRaWAN network server
(note: this project and below steps assume that a ChirpStack based private LoRaWAN network is active and in range of the STM32WL55 Nucleo LoRaWAN sensor node, if not refer to TechForum post Set up a private LoRaWAN Sensor Network with Machinechat and Seeed SenseCAP)
1 - In ChirpStack, select Service-profiles and Create. Name Service-profile “STM32WL”, select Network-server “Chirpstack Network Server” and check Add gateway meta-data box.

2 - In ChirpStack, select Device-profile and Create. Name Device-profile “STM32WL Sensors”, Select “1.0.2” for LoRaWAN MAC version, Select “A” for LoRaWAN Regional Parameters version, Select “Default ADR algorithm” for ADR algorithm, and enter “3600” for Uplink interval. In JOIN(OTAA/ABP) tab, check box for “Device supports OTAA”. In CODEC tab, select “Cayenne LPP” in CODEC dropdown list.

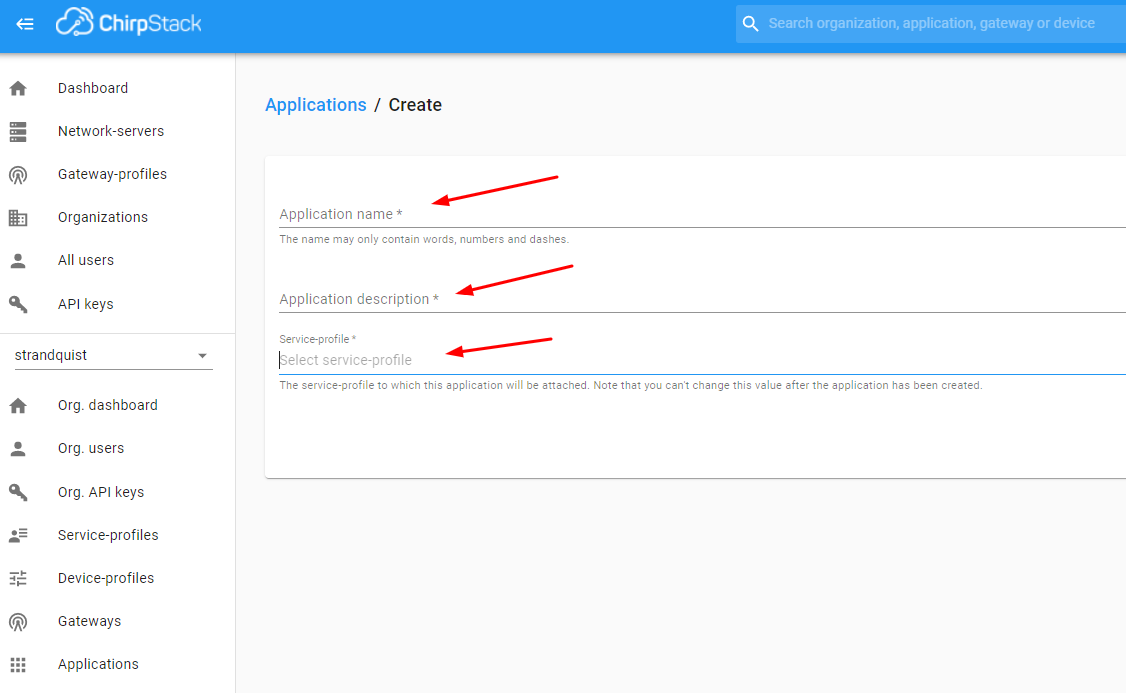
3 - In ChirpStack, select Applications and Create. Enter “FarmTest” for Application name, enter “description” for Application description, and select “STM32WL” for Service-profile.
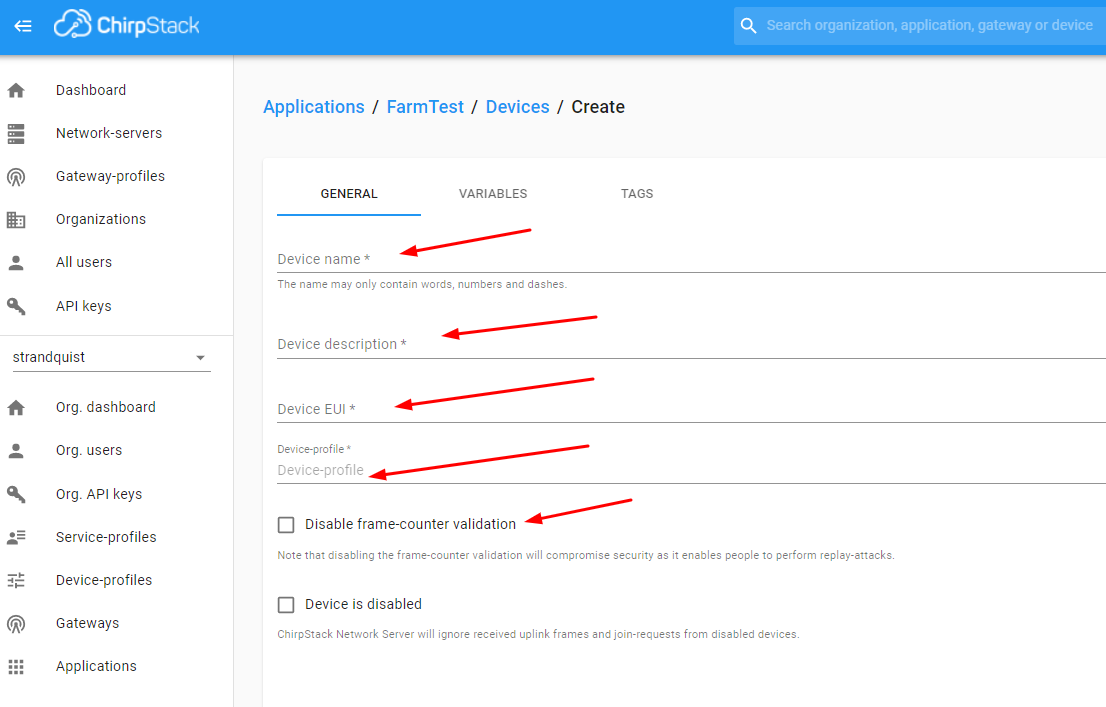
4 - In ChirpStack, select Applications, then select “FarmTest” and then select Create. Enter “STM32WL55project” for Device name, enter “description” for Device description, enter Device EUI for STM32WL55 Nucleo board (same # as entered in “se-identity.h”), enter “STM32WL Sensors” for Device-profile, and select CREATE DEVICE. (note: for initial testing and demonstration you may want to check Disable frame-counter validation box)
5 - Add Application key for Device. Enter Application key from “se-identity.h” (see slide 151 of “STM32WL Workshop slide deckRev2.pd"f”) and select SET DEVICE-KEYS.

Run STM32WL55 Nucleo LoRaWAN sensor node firmware to check for join to ChirpStack LoRaWAN network server
(note: NUCLEO-WL55JC1 board needs to be connected to PC with STM32CubeIDE)
1 - Test the NUCLEO-WL55JC1 board with serial terminal - check COM port number, start Tera Term and configure . Follow instructions on slides 169-172 of “STM32WL Workshop slide deckRev2.pd"f”.
2 - Test the NUCLEO-WL55JC1 board with serial terminal - run program and check Tera Term serial terminal to verify network join.. Follow instruction on slide 173 of “STM32WL Workshop slide deckRev2.pd"f”.

Update STM32WL55 Nucleo board firmware to include IKS01A3 Sensor Shield integration
1 - Review the IKS013A Sensor Shield info on slides 193-197 of “STM32WL Workshop slide deckRev2.pdf”.
2 - Modify, build and load updated sensor node firmware into STM32WL55 Nucleo board. Follow instructions on slides 199-211 of “STM32WL Workshop slide deckRev2.pd"f”.
Run updated STM32WL55 Nucleo LoRaWAN sensor node firmware to check for join to ChirpStack LoRaWAN network server
(note: NUCLEO-WL55JC1 board needs to be connected to PC with STM32CubeIDE)
1 - Test the NUCLEO-WL55JC1 board with serial terminal - check COM port number, start Tera Term and configure . Follow instructions on slides 169-172 of “STM32WL Workshop slide deckRev2.pd"f”.
2 - Test the NUCLEO-WL55JC1 board with serial terminal - run program and check Tera Term serial terminal to verify network join.. Follow instruction on slide 173 of “STM32WL Workshop slide deckRev2.pd"f”.
3 - Optional step if NUCLEO-WL55JC1 board does not join network. In Chirpstack, select Applications, then select Application “FarmTest”, then select Device “STM32WL55project”, then select CLEAR DEVNONCE. Check Tera Term serial terminal for network join.

Set up and test ChirpStack HTTP Integration with JEDI Pro Generic LoRaWAN Custom Data Collector
ChirpStack is modified to add HTTP integration for forwarding LoRaWAN meta and sensor data to a specified IP address. Machinechat’s Generic LoRaWAN Custom Data Collector Plug-in is used for listening to the specified IP address and parsing the LoRaWAN data for review (when debug enabled) and use in the JEDI Pro platform.
(note: The Custom Data Collector consists of two files, lorawan-linux.bin and config.yml that are available from Machinechat at: https://support.machinechat.io/hc/en-us/articles/6046199010327-Generic-LoRaWAN-Custom-Data-Collector-Beta-for-JEDI-PRO-Linux )
1 - Enable HTTP Integration in ChirpStack.
Select “Add” in ChirpStack Integrations screen.

2 - Configure HTTP Integration
Select “JSON” for Payload marshaler , add IP address (use same IP as in config.yml file) for Endpoint URL , and select ADD INTEGRATION

3 - Copy lorawan-linux.bin and config.yml files to the ~/jedi/plugins directory where JEDI Pro is installed on the Ubuntu Linux Mini-PC. Modify config.yml file to enable debug and specify IP listening address.

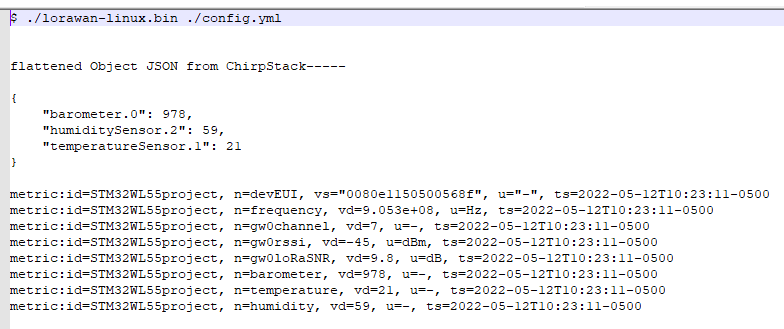
4 - Run Custom Plug-In on command line using “./lorawan-linux.bin ./config.yml” on terminal in Ubuntu Linux Mini-PC and monitor output data. Data should look similar to below (note: remember to make lorawan-linux.bin file executable):
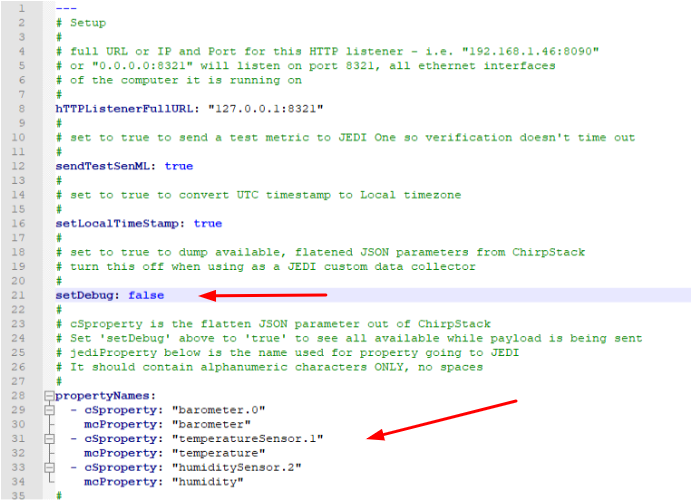
5 - Edit config.yml file to map LoRaWAN data to JEDI Pro data parameters and disable debug. For this project example, edit propertyNames so LoRaWAN cSproperty: “barometer.0” is mapped to mcProperty: “barometer”, LoRaWAN cSproperty: “temperatureSensor.1” is mapped to mcProperty: “temperature”, and LoRaWAN cSproperty: “humiditySensor.2” is mapped to mcProperty: “humidityr”. Disable debugging by setting “setDebug:” to false and save file.
Set up JEDI Pro Custom Data Collector and Data Dashboard
In JEDI Pro, select “Settings” tab, then select “Data Collectors” and select “Add Collector”.

Configure Collector as shown below. Name Data Collector “LoRaWAN” (or whatever you prefer), select Collector Type as “Custom Plug-In”, select “lorawan-linux.bin” as Plug-In Executable file, enter location of config.yml file (example: “/home/scottr/jedi/plugins/config.yml” for Plug-in Options, select check box for “Run As Background Process and Monitor” , then select “VALIDATE PLUG-IN” to verifiy functionality.

In JEDI Pro, select “Data Dashboards”, then select “+” to add a new chart.
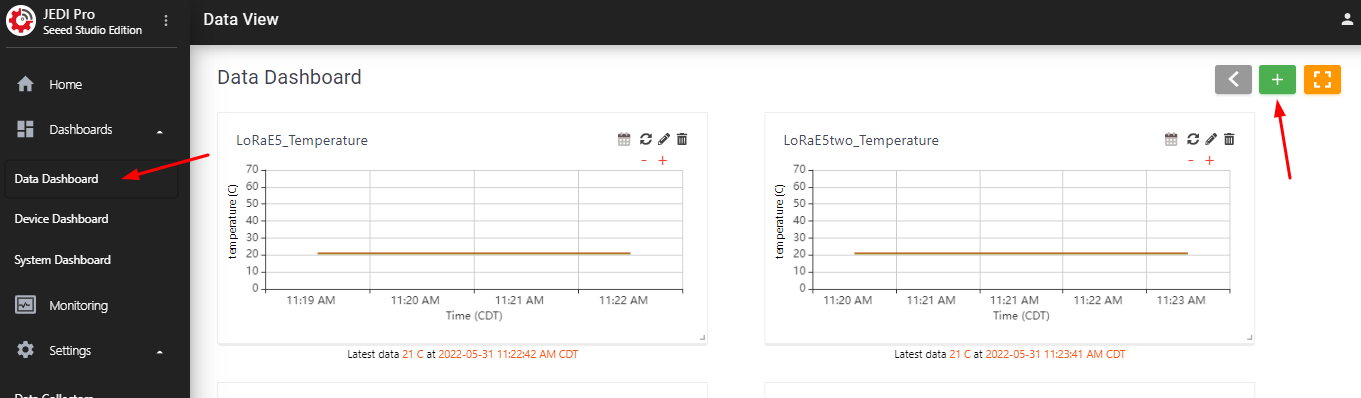
Configure data chart and select “Add” to include in your Data Dashboard(see example below)

Conclusion
ST’s STM32WL Nucleo board LoRaWAN End Node workshop project is easily modified and added to a private LoRaWAN network. ChirpStack’s HTTP Integration and Machinechat’s Generic LoRaWAN Custom Data Collector are then configured to bring the LoRaWAN End Node sensor data into JEDI Pro for IoT data collection, visualization, monitoring and data storage. The modified workshop example serves as a general reference for customers interested in creating customized STM32WL based LoRaWAN sensor nodes for their own private LoRaWAN network use case.
References
- ST - LoRaWAN® Hands-on Development with the STM32WL Wireless System-on-Chip MCU
- ST - AN5406 – Building a LoRaWAN app
- Seeed - Odyssey Blue J4105 Mini PC
- Seeed - SenseCAP Outdoor Gateway - LoRaWAN US915MHz
- Getting Started with machinechat’s JEDI One IoT Platform
- Machinechat - Building a private, edge-based LoRaWAN IoT sensor network