Summary
This article presents an elementary Liquid Crystal Display (LCD) application for the Arduino Nano R4. It emphasizes the Qwiic connection’s speed and ease of use. The technical details are also applicable to the Arduino UNO R4 WiFi, which shares the same microcontroller and Qwiic connection.
![]() Estimated reading time: 3 minutes
Estimated reading time: 3 minutes
What is the Arduino Nano R4?
The Arduino Nano R4 is the smallest member of a family of Arduino evaluation boards. Like other family members, it is based on the 32-bit Renesas RA4M1 Cortex-M4 core microcontroller. The family members include:
Which LCD interface is better: I2C or Parallel?
Figure 1 presents two methods including the traditional parallel interface as well as the Qwiic connection.
-
Parallel: Hundreds of articles have been written about the traditional parallel interface. To learn more about this technique (blue wires in Figure 1) refer to this Liquid Crystal Displays (LCD) with Arduino.
-
Serial: The serial interface is preferred over parallel as it reduces the number of required wires. A recent addition to Arduino is the user-friendly Qwiic (I2C serial) connection. The SparkFun 16397 LCD featured in Figure 1 requires only 4 physical wires. For a brief introduction to Qwiic, refer to this article. It describes Qwiic as convenient but limited in speed and distance. This may or may not be a problem for your application.
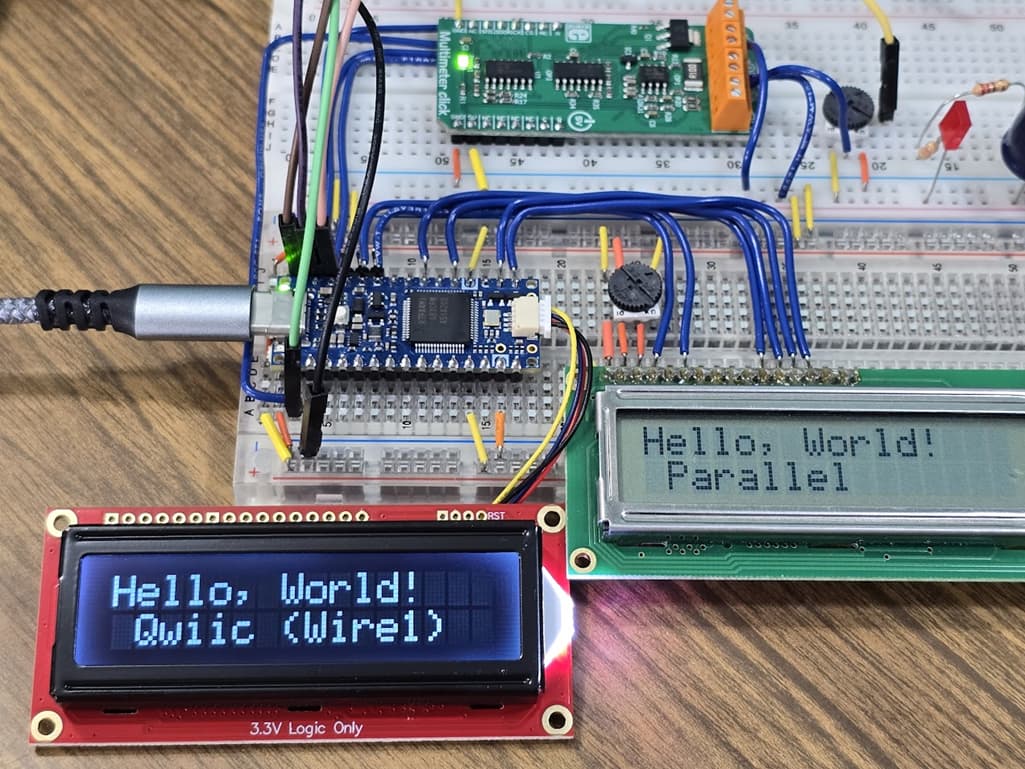
Figure 1: Author’s workbench showing the Arduino Nano R4 connected to both a Qwiic LCD and a Parallel connected LCD.
Tech Tip: Don’t forget the Qwiic cable (not included with Nano R4 or LCD). Many options are available from DigiKey. However, you may find this SparkFun 15081 kit especially useful if you plan on experimenting with other Qwiic boards.
Do all Arduino R4 boards have the Qwiic connection?
No, the Qwiic is limited to the Nano R4 and the UNO R4 WiFi. However, a Qwiic shield, such as the SparkFun 14352, may be added.
Tech Tip: Watch out for Arduino’s Wire and Wire1 when using the Qwiic connection. The legacy Wire object is used for the on-board I2C connections while the Wire1 is used for the Qwiic interface. Refer to this article for more information.
How is the Qwiic LCD programmed?
The Application Programming Interface (API) for the Qwiic-connected LCD is like the classic parallel interface. You may already be familiar with functions such as:
lcd.clear();                 // Clear the LCD
lcd.setCursor(0, 1);         // set the cursor to the first position on line 2
lcd.print(“Hello, World!”);  // Print the text starting at the cursor
To learn more about the API, refer to SparkFun’s SparkFun_SerLCD_Arduino_Library. This contains many examples showing how to operate the LCD with topics ranging from elementary usage to setting the splash screen on startup.
Getting Started
Be sure to install the Arduino library as shown in Figure 2.

Figure 2: Install the SerLCD library using the Arduino Library Manager.
Example Program
#include <SerLCD.h>  //Click here to get the library: http://librarymanager/All#SparkFun_SerLCD
SerLCD Qwiic_lcd;    // Initialize the library with default I2C address 0x72

void setup() {

// Essential and often overlooked: We must use Wire1 for the Nano R4 Qwiic connection.

  Wire1.begin();
  Qwiic_lcd.begin(Wire1);
  Qwiic_lcd.setBacklight(255, 255, 255);
  Qwiic_lcd.setContrast(5);

  Qwiic_lcd.clear();
  Qwiic_lcd.print("LCD Demo using");
  Qwiic_lcd.setCursor(0, 1);
  Qwiic_lcd.print(" Qwiic (Wire1)");
  delay(4000);

  Qwiic_lcd.clear();
  Qwiic_lcd.print("Hello, World!");
}

void loop() {
  Qwiic_lcd.setCursor(0, 1);
  Qwiic_lcd.print(millis() / 1000);
}
Related Articles by this Author
If you enjoyed this article, you may also find these related articles helpful:
- Arduino Uno R4 WiFi in Higher Education
- Qwiic FAQ for the Arduino UNO WiFi and Arduino Nano R4
- How to Interface a Microcontroller with a Relay Using a MOSFET
- How to Obtain Positive and Negative Voltage Rails from a Single Output Power Supply
![]() Article by Aaron Dahlen, LCDR USCG (Ret.), Application Engineer at DigiKey
Article by Aaron Dahlen, LCDR USCG (Ret.), Application Engineer at DigiKey