How to Terminate Panduit Mini-Com® TX6™ PLUS RJ45 Jacks
If you’re installing network cabling and want a reliable, high-performance solution, the Panduit Mini-Com® TX6™ PLUS system is a great choice. These connectors are designed for Category 6 performance and feature an easy-to-use termination process that ensures consistent results. Below I am going to walk you through a step-by-step guide to help you terminate these jacks correctly.
Part I used
- 298-12558-ND – Panduit Mini-Com® TX6™ PLUS RJ45 Jack
Tools I used
-
298-10149-ND – Wire stripper
-
298-10150-ND – Flush cut side cutters
-
298-12634-ND – Panduit termination tool
Step-by-Step Instructions
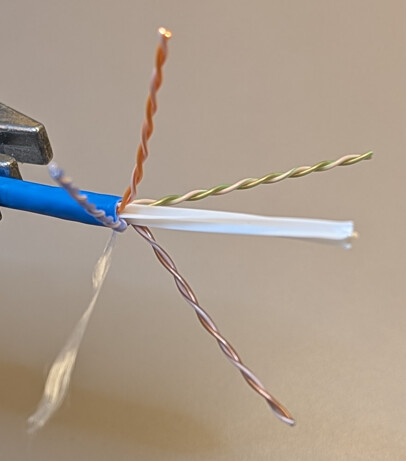
Prepare the Cable
- Strip about 2 inches of the outer jacket.
- Trim any nylon cord and cable separator if present.
Identify the Color Code
- Check the wire cap for the printed color codes.
- For most commercial installations, use T568B (the “B” code), but I suggest verifying with your application.
Position the Wires
- Guide each twisted pair into the correct slot on the cap using the printed diagram.
- Do not untwist or rearrange wires as they should match up with the cap color codes

Secure the Strain Relief
- Use the Panduit termination tool (298-12634-ND) to compress the built-in strain relief.
- If you need to reposition, press the release tabs to reopen the strain relief and try again.

Terminate the Wires
- Do not untwist more than necessary.
- Guide each conductor into the correct slot on the cap using the printed diagram.
- Keep the twists as close to the termination point as possible for optimal performance.
- Once terminated correctly, Using your Flush cut side cutters, trim off the excess wire.


Insert the Cap into the Jack
- Slide the cap into the jack body, ensuring correct orientation.
- Use the termination tool again to press the cap fully into the jack. This action fully terminates the wires inside.


Tips for Best Results
- Avoid excessive untwisting of pairs, as this can affect signal integrity.
- Double-check orientation before final termination to prevent wiring errors.
- If you’re working with shielded cable, confirm compatibility with the jack type.
Disassembly
If needed, these can also be disassembled, and reused. Using a flat blade screwdriver, you can lift the tab, then gently rotate forward till the cap releases from the connector. You can also release the strain relief by pinching the two tabs at the back of the cap.

For a full list of available Mini-Com® TX6™ PLUS options, please check out https://www.digikey.com/short/jnbwvt2m.