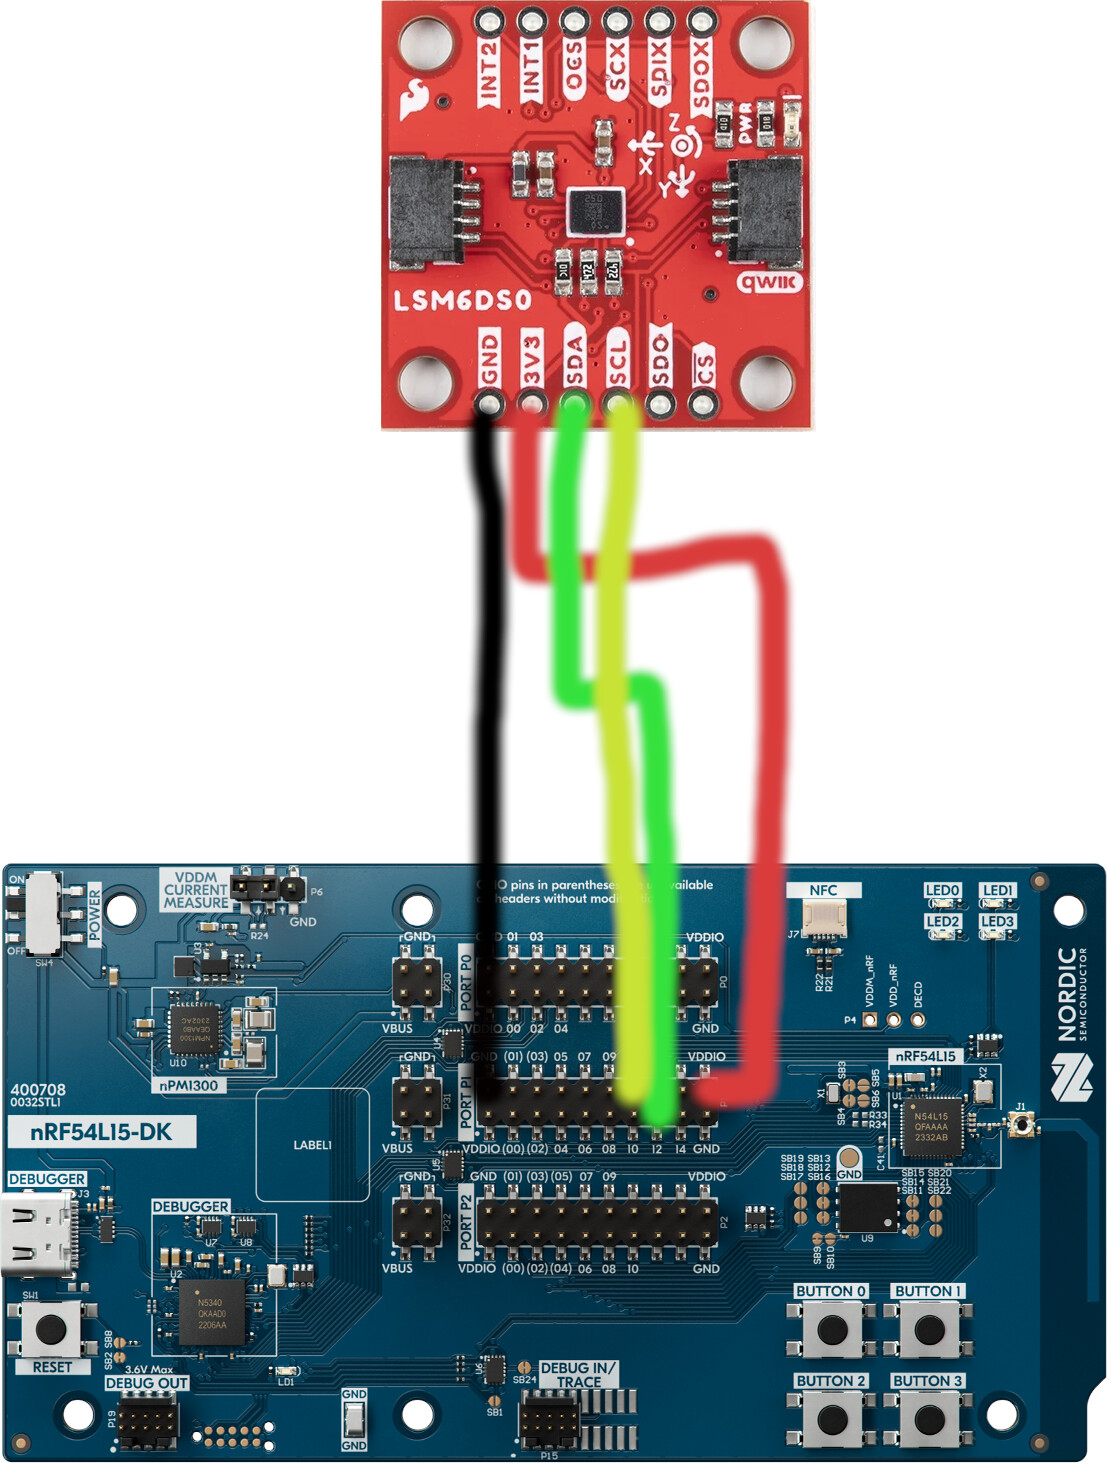
Before continuing with this article, please refer to the previous installation steps to the Nordic nRF54L15-DK development kit. Here we will describe the process of interfacing this nRF54L15-DK development kit for IoT LSM6DSO I2C sensor available from Digikey. The following picture shows how both items are connected,
The first step is to create the following directory structure with the following relevant Zephyr OS dev files,
|-- CMakeLists.txt
|-- nrf54l15dk_nrf54l15.overlay
|-- prj.conf
`-- src
    `-- main.c
The CMakeLists.txt is as follows,
cmake_minimum_required(VERSION 3.20.0)
find_package(Zephyr REQUIRED HINTS $ENV{ZEPHYR_BASE})
project(blinky)

target_sources(app PRIVATE src/main.c)
The proj.conf file as shown below (CONFIG_CBPRINTF_FP_SUPPORT is used to provide floating point print support),
CONFIG_GPIO=y

CONFIG_I2C=y

CONFIG_CBPRINTF_FP_SUPPORT=y
and most important the following overlay file that will allow the LSM6DSO sensor via the I2C interface to couple into our main.c Zephyr “RTOS” application runnnng inside the Nordic nRF54L15-DK development kit available from Digikey. Here is the overlay file needed where the I2C interface master frequency was setup to 100 KHz and the I2C slave address of 0x6B,
&i2c22 {
    status = "okay";
    pinctrl-0 = <&i2c22_default>;
	pinctrl-1 = <&i2c22_sleep>;
    clock-frequency = <100000>;
    pinctrl-names = "default", "sleep";
    mysensor: mysensor@6b{
        compatible = "i2c-device";
        status = "okay";
        reg = < 0x6b >;
    };
};

&pinctrl {
	/omit-if-no-ref/ i2c22_default: i2c22_default {
		group1  {
			psels = <NRF_PSEL(TWIM_SCL, 1, 11)>,
					<NRF_PSEL(TWIM_SDA, 1, 12)>;
		};
	};

	/omit-if-no-ref/ i2c22_sleep: i2c22_sleep {
		group1  {
			psels = <NRF_PSEL(TWIM_SCL, 1, 11)>,
					<NRF_PSEL(TWIM_SDA, 1, 12)>;
			low-power-enable;
		};
	};
};
The main.c will look like this,
#include <stdio.h>
#include <zephyr/kernel.h>
#include <zephyr/drivers/gpio.h>
#include <zephyr/drivers/i2c.h>
#include <zephyr/sys/printk.h>


#define I2C_NODE DT_NODELABEL(mysensor)
static const struct i2c_dt_spec dev_i2c = I2C_DT_SPEC_GET(I2C_NODE);
#define WHOAMI  0x0F

/* 1000 msec = 1 sec */
#define SLEEP_TIME_MS   1000

/* The devicetree node identifier for the "led0" alias. */
#define LED0_NODE DT_ALIAS(led0)


static const struct gpio_dt_spec led = GPIO_DT_SPEC_GET(LED0_NODE, gpios);

int main(void)
{


    if (!device_is_ready(dev_i2c.bus)) {
	    printk("I2C bus %s is not ready!\n\r",dev_i2c.bus->name);
	    return -1;
    }

	int ret;
	bool led_state = true;

	if (!gpio_is_ready_dt(&led)) {
		return 0;
	}

	ret = gpio_pin_configure_dt(&led, GPIO_OUTPUT_ACTIVE);
	if (ret < 0) {
		return 0;
	}

	while (1) {

        uint8_t id = 0;
	    uint8_t regs[] = {WHOAMI};

        int ret = i2c_write_read_dt(&dev_i2c, regs, 1, &id, 1);

	    if (ret != 0) {
		    printk("Failed to read register %x \n", regs[0]);
		    return -1;
	    }

	    if (id != 0x6C) {
		    printk("Invalid chip id! %x \n", id);
		    return -1;
	    }
        else {
            printk("Found WHOAMI = %x\n", id);
        }

		ret = gpio_pin_toggle_dt(&led);
		if (ret < 0) {
			return 0;
		}

		led_state = !led_state;
		printf("LED state: %s\n", led_state ? "ON" : "OFF");
		k_msleep(SLEEP_TIME_MS);


        //Read and print values
        uint8_t values[65];
	    ret = i2c_burst_read_dt(&dev_i2c, 0x00, values, 64);
	    if (ret != 0) {
		    printk("Failed to read registers %x \n", 0x00);
		    return;
	    }
        int i = 0;
        while(i < 64)
        {
            printk("Register %x = %x\n", i, values[i]);
            i = i + 1;
        }

	}

	return 0;
}
This main.c blinks the LED as it also reads the WHOAMI register and performs autoincrement (burst) read of 65 register addresses in the ASIC of the sensor. These I2C transactions,
int ret = i2c_write_read_dt(&dev_i2c, regs, 1, &id, 1);
ret = i2c_burst_read_dt(&dev_i2c, 0x00, values, 64);
are via the Zephyr OS API and the appropiate macrobatics. In order to compile (build) this perform this step,
(venv) $ west build -p always -b nrf54l15dk/nrf54l15/cpuapp -- -DEXTRA_DTC_OVERLAY_FILE=nrf54l15dk_nrf54l15.overlay
then program the Nordic nRF54L15-DK as follows,
(venv) $ west flash
Once it is programed, the following setup is used to demonstrate this I2C communication capability with the SparkFun 6 Degrees of Freedom Breakout - LSM6DSO .
The video shows the LED blinking as the I2C interface is communicating with the LSM6DSO sensor while the Sparkfun 8-channel USB Logic Analyzer previously described in this Techforum article is capturing the I2C communication.
The nRF54L15-DK development kit for IoT is connected the host via USB. The Sparkfun 8-channel USB Logic Analyzer captured the I2C transactions demonstrating is properly working as shown below,

Now open a minicom terminal using this command,
minicom -D /dev/ttyACM1
to monitor the data received from the Nordic nRF54L15-DK that it acquires from the SparkFun 6 Degrees of Freedom Breakout - LSM6DSO WHOAMI register as shown below,
Found WHOAMI = 6c
LED state: ON
Register 0 = 0
Register 1 = 0
Register 2 = 3f
Register 3 = 0
Register 4 = 0
Register 5 = 0
Register 6 = 0
Register 7 = 0
Register 8 = 0
Register 9 = 0
Register a = 0
Register b = 0
Register c = 0
Register d = 0
Register e = 0
Register f = 6c
Register 10 = 0
Register 11 = 0
Register 12 = 4
Register 13 = 0
Register 14 = 0
Register 15 = 0
Register 16 = 0
Register 17 = 0
Register 18 = e0
Register 19 = 0
Register 1a = 0
Register 1b = 0
Register 1c = 0
Register 1d = 0
Register 1e = 0
Register 1f = 28
Register 20 = 0
Register 21 = 0
Register 22 = 0
Register 23 = 0
Register 24 = 0
Register 25 = 0
Register 26 = 0
Register 27 = 0
Register 28 = 0
Register 29 = 0
Register 2a = 0
Register 2b = 0
Register 2c = 0
Register 2d = 0
Register 2e = 0
Register 2f = 0
Register 30 = 0
Register 31 = 0
Register 32 = 0
Register 33 = 0
Register 34 = 0
Register 35 = 0
Register 36 = 0
Register 37 = 0
Register 38 = 0
Register 39 = 0
Register 3a = 0
Register 3b = 0
Register 3c = 0
Register 3d = 0
Register 3e = 0
Register 3f = 0
Found WHOAMI = 6c
LED state: OFF
This article described how to connect a sensor via I2C to the Nordic nRF54L15-DK development board available from the Digikey. Digikey carries many I2C sensors that can be attached to this IoT Nordic nRF54L15-DK development kit for many IoT projects using the steps described here. Have a nice day!
This article is also available in spanish language here..
Este artículo está disponible en lenguaje español aquí.