
Introduction
When testing or debugging a remote node in a Digi Xbee3 Zigbee network it may be useful or more convenient to send a command over the air to the device rather than physically traveling to the remote node. In this example project a Zigbee test node located on the roof of Digi-Key Electronics headquarters building is remotely reset from an indoor Zigbee node located in engineering. Digi’s XCTU Configuration & Test Utility software is used to set up and send a firmware reset command over the air to the remote Zigbee node.
Hardware
- XB3-24Z8US-J Digi XBee3 RF Module at Digi-Key
- XBee SMT Grove Development Board at Digi-Key
Supplier Documentation
- Digi XCTU Configuration & Test Utility Software User Guide
- Digi XBee3 Zigbee 3.0 Module User Guide
- Digi Xbee Grove Development Board User Guide
What is XCTU?
XCTU is Digi’s free multi-platform configuration and test utility that enables developers to interact with their RF modules through a simple-to-use graphical interface. It includes all of the tools a developer needs to quickly get up and running with XBee. Features include network view, which graphically represents the XBee network along with the signal strength of each connection, and the XBee API frame builder, which helps to build and interpret API frames for XBees being used in API mode. XCTU includes a set of embedded tools such as: Frames generator to easily generate any kind of API frame to save its value; Frames interpreter to decode an API frame and see its specific frame values; Recovery to recover radio modules which have damaged firmware or are in programming mode; Load console session to load a console session saved in any PC running XCTU; Range test to perform a range test between 2 radio modules of the same network; Firmware explorer to navigate through XCTU’s firmware library.
Installation
The latest version of XCTU can be downloaded from DOWNLOAD XCTU .
Step 1: Setup Hardware and Start XCTU
The Zigbee radio used to send the remote command is an Xbee3 Zigbee module mounted in a Xbee Grove board. It is connected over USB to a Windows 10 laptop running XCTU. The Zigbee radio (Xbee3/Grove board) being used must be part of the same Zigbee network as the remote node the command will be sent to.

The Xbee3 radio used to send the remote AT command must be configured as a Zigbee router in “API Mode Without Escapes” to send remote Xbee AT commands over the air. Start the XCTU utility and include the Xbee3 Zigbee radio that will be used to send the remote command. For this project “Network_Probe2” will be used to send a remote FR (firmware reset) command to the Zigbee node located on the roof.

Step 2: Open Serial Console to Zigbee Radio
Select Serial Console and open connection to Zigbee radio. For this project “Network_Probe2” will be connected to the Serial Console.

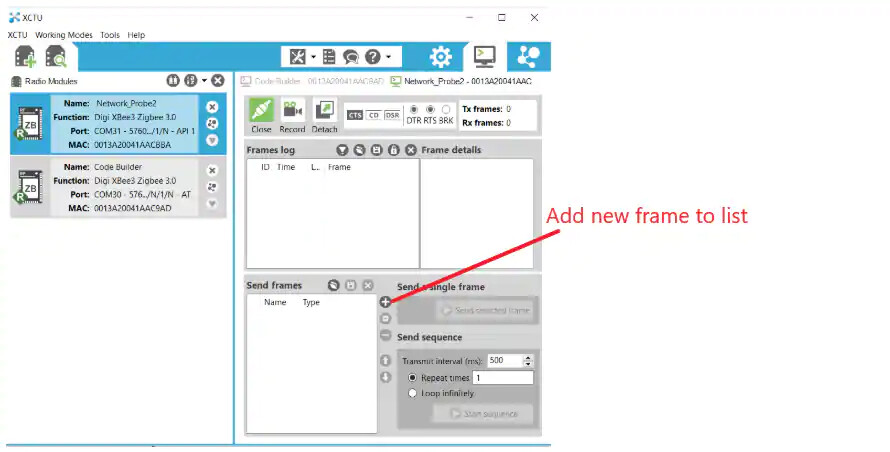
Step 3: Add New Frame to List and Open API Frame Generator
Select “+” to Add new frame to list
Select "Create frame using ‘Frames Generator’ tool

Step 4: Generate Remote Firmware Reset Command
Select Frame type: “0x17 - Remote AT Command”, enter 64-bit destination address (address of remote Zigbee radio receiving command), set AT command to ASCII “FR” (Firmware Reset) and select “OK”

For this project change Frame name is changed to “send remote FR” (note: this is not necessary but is useful if you want to save frame for future use). Select “Add frame” to add to frame list.

Step 5: Send Remote AT Command “FR”
Select Send selected frame containing remote FR command to reset remote Zigbee node.

Response received in Frames log after FR command sent to remote Zigbee node.
