For developers that use the Raspberry Pico 2 or other I2C capable devices like the Arduino, etc (that don’t have the QWIIC system already included) to add the QWIIC I2C system into their prototypes, the Breakout Board Connectivity Qwiic Platform Evaluation Expansion Board is a simple option that can be used to include QWIIC connectivity.

A 4 pin header is soldered to the board,

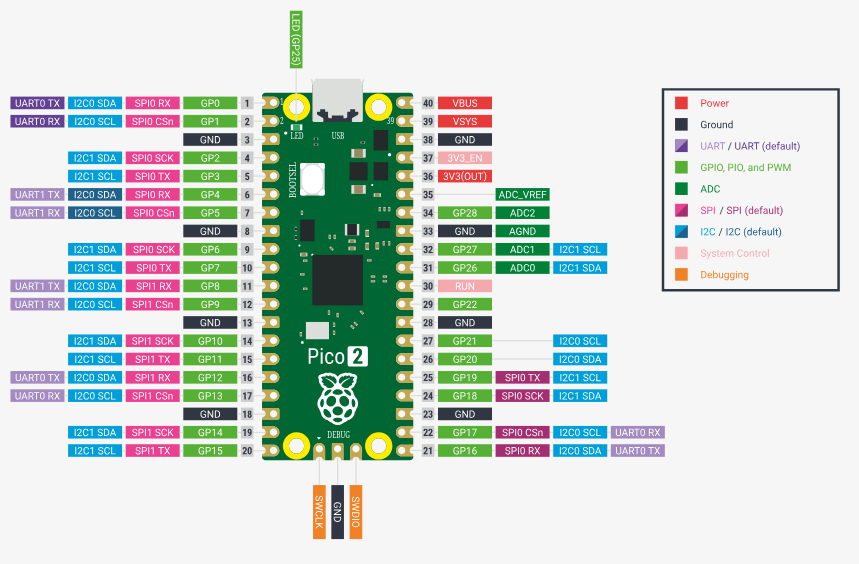
and this allows the user to connect the QWIIC to a board as follows,

connecting the proper I2C signals with jumpers or cables as needed from the Raspberry Pico 2 using this diagram (3.3V, GND, SDA, SCL) ,
to the Breakout Board Connectivity Qwiic Platform Evaluation Expansion Board, and then include the QWIIC compatible cables to the relevant modules in the I2C bus as shown below,

The QWIIC compatible cables are available in different lengths as needed. In a previous article, it was shown that there is also other ways to do this using the QWIIC compatible cables. Also in another article the Adafruit BME280 Humidity + Barometric Pressure + Temperature Sensor Breakout Evaluation Board was interfaced using a header in a prototype perforated board, but here we are showing how to do it, using that prototype board with the Raspberry Pico 2 via the Breakout Board Connectivity Qwiic Platform Evaluation Expansion Board option as follows,

The Breakout Board Connectivity Qwiic Platform Evaluation Expansion Board is an excellent alternative to include the I2C QWIIC system into different prototypes and is available at DigiKey.
Have a great day!
Prototype Boards Perforated | Electronic Components Distributor DigiKey
This article is also available in spanish here.
Este artículo está disponible en español aquí.