The Sparkx i7 is Creality’s simplest setup of their 3D printers, only requiring the removal of 4 screws and the connection of 4 tubes from the CFS lite to the Sparkx i7. This setup guide will walk you through the removal of the printer from the box and the setup process.
Unboxing
The unboxing of the Sparkx i7 can be done by a single person.


After cutting open the top of the box there is a QR code that will bring you to Creality’s online setup guide for the Sparkx i7.

Under the next two folds will be a piece of cardboard covering the contents. This help keep everything flat and also as an extra barrier when cutting the top tape.

The first parts to remove from the packaging are the cardboard sleeve for the print bed. The quick start guide, box of tools and the spool holder.


Next the CFS lite can be removed from the box and placed to the side for later when setting up the printer.

There is a box to the rear of the printer that can be removed.

This contains the power cable and connections for the CFS lite.

The foam on top of the printer can now be removed. There is a piece that the CFS lite rested on and a piece at the rear that was under the box that contained the power cable and CFS lite connections.

The printer can now be removed from the box using the top cross beam and placed on the table to finish the setup of the Sparkx i7.
Printer Setup
This section goes over the removal of extra packaging and the prep before the first power on.
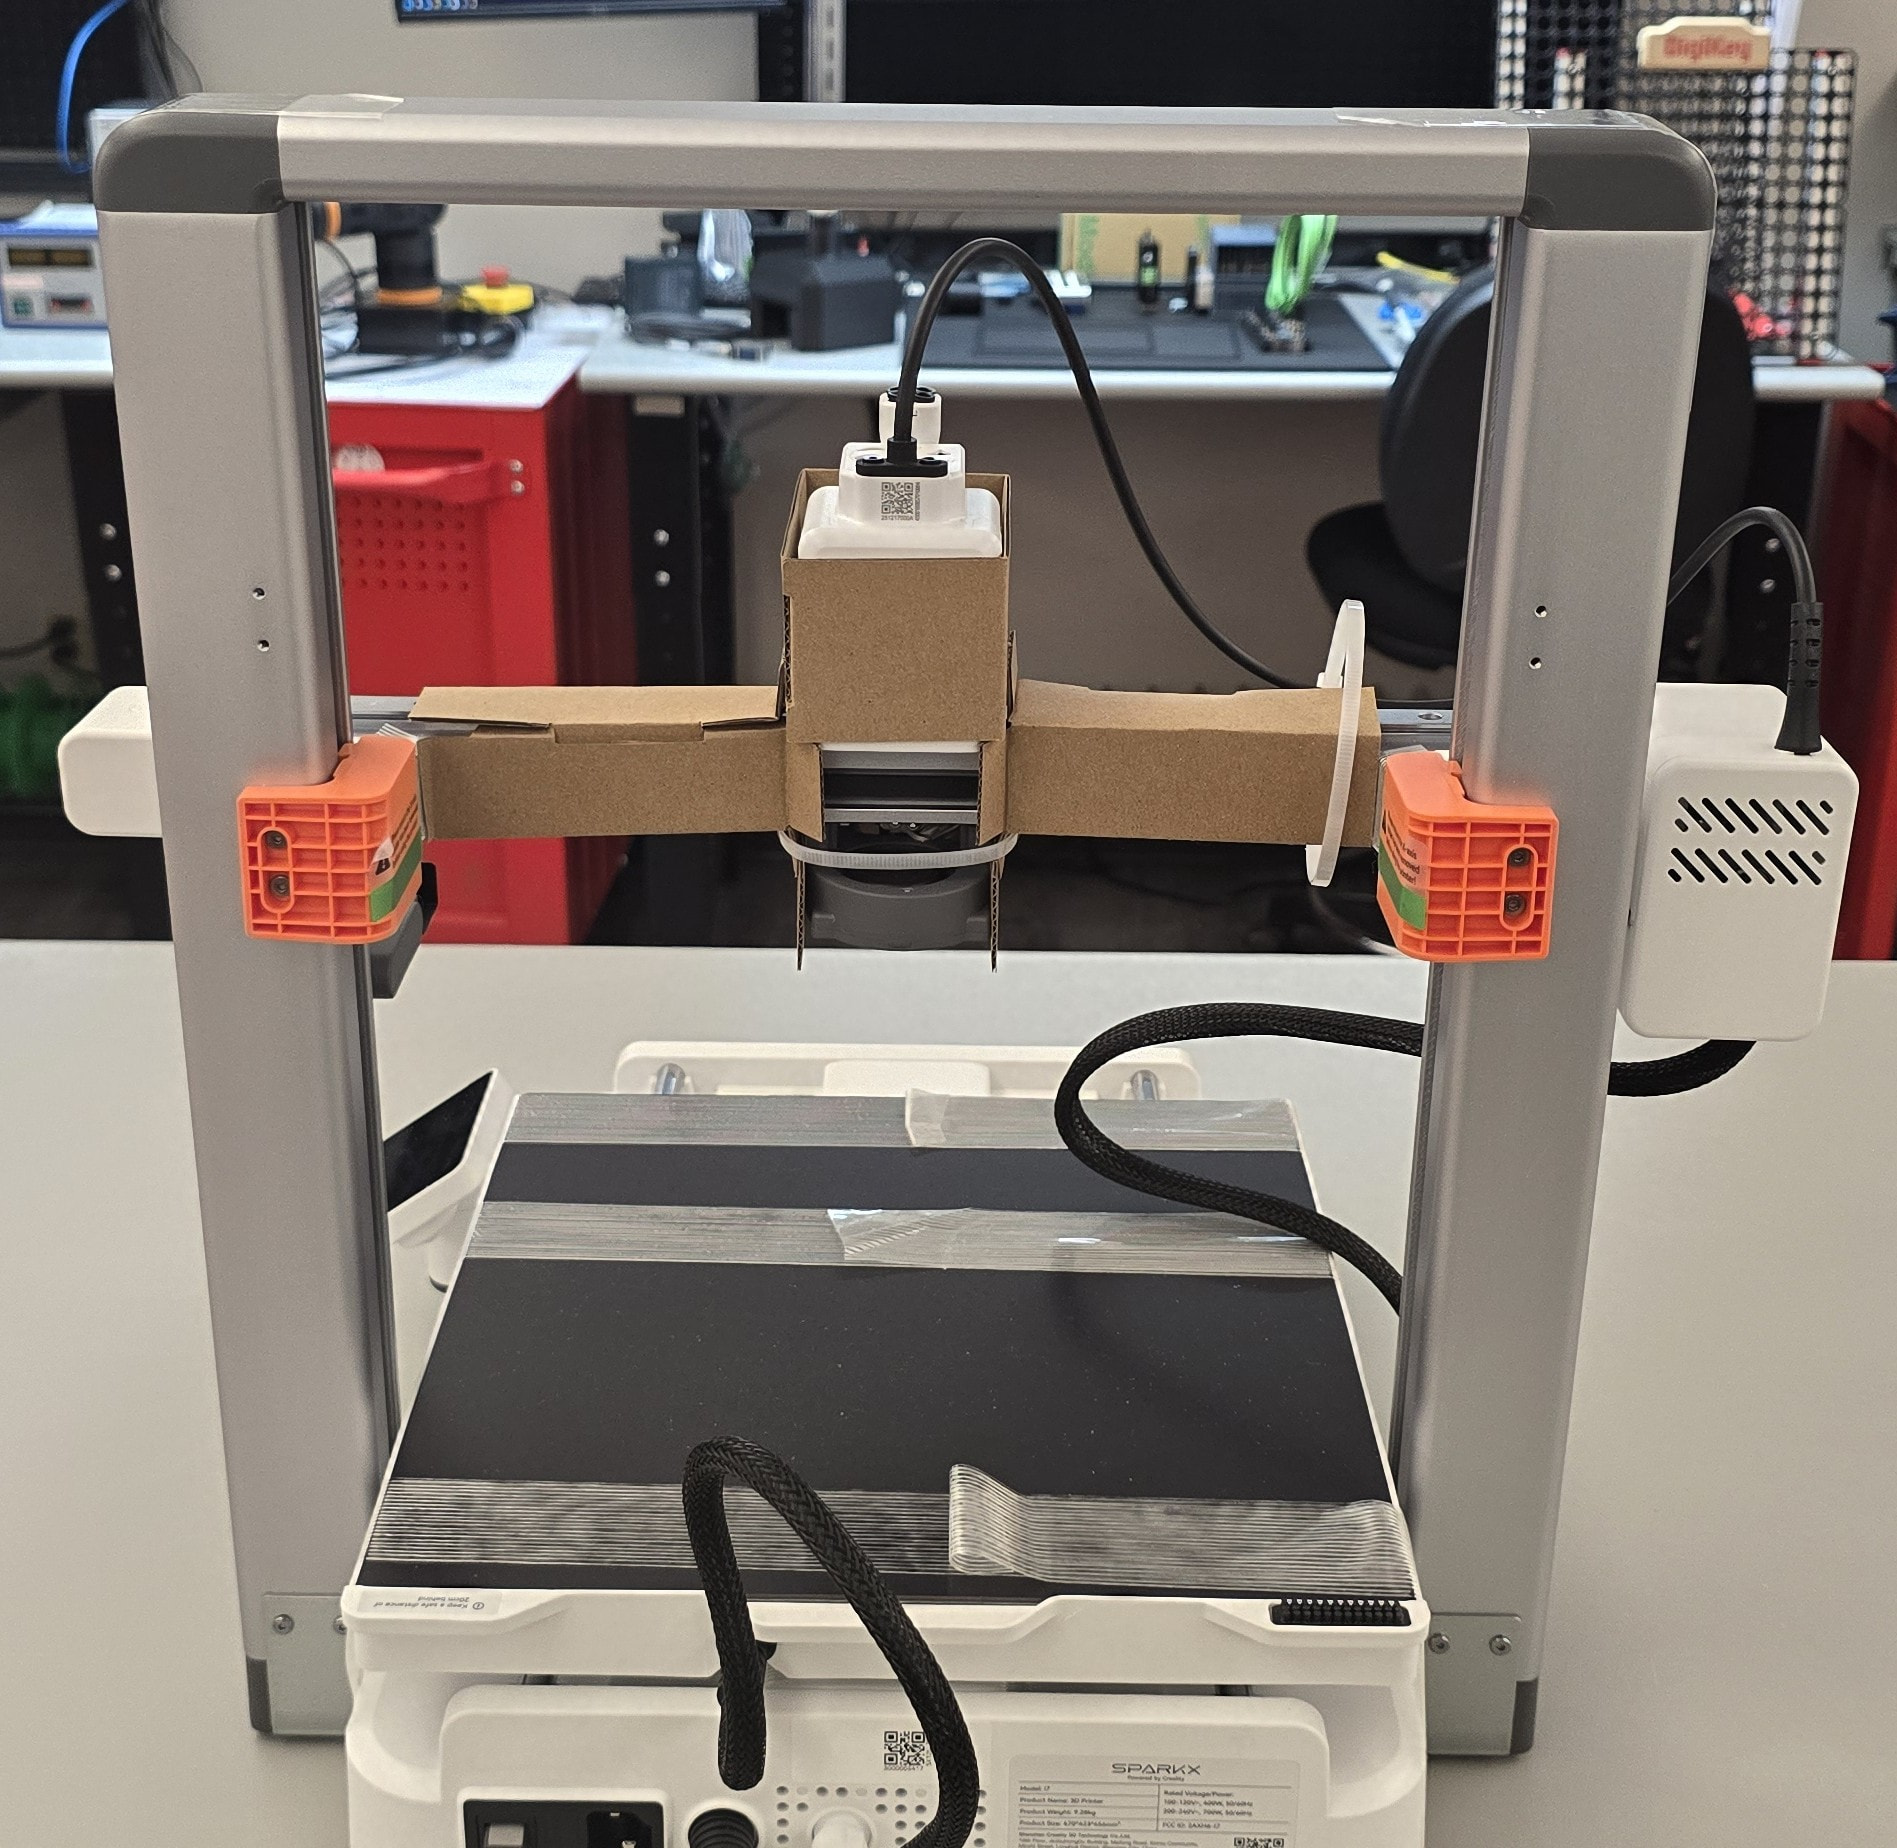
Looking at the Sparkx i7 from the rear, there are 2 orange brackets that hold the X-axis in place for shipping.

To remove the brackets, use the 2mm hex wrench (the smaller of the two included accessory tools) to remove the two screws from each bracket.


After this step there should be 4 screws and 2 brackets.

Next the tape that holds the crossbar covers can be removed.

When peeling the tape off hold onto the sides of the cover.

Otherwise the cover might be removed instead of the tape. If the cover comes off when removing the tape, it can be snapped back into place.
After the tape on the crossbars is removed, the cardboard on the X-axis gantry can be removed. There are two cable ties that need to be removed. A site cutter is not supplied with the printer, if one is not available a pair of scissors can be used to cut them.

Once the cable ties have been cut, the cardboard can be removed.
Now the tape that holds the print bed in place can be peeled off the printer. The tape wraps around to the underside of the printer. The tape is folded over for it to be removed easier.

There is also a section of tape at the rear of the printer that needs to be removed.


Next remove the print bed from the cardboard sleeve and place it on the print bed.

There is a notch at the back of the printer bed to orientate the print bed to.
The screen needs to be rotated from its shipping position. Some force needs to be used to move it, but still be careful to not over rotate the arm.


The protection film on the screen can be removed at this time if desired.
The printer comes with an external spool holder that mounts to the top cross bar. This should be used if you plan on printing with filaments that are not compatible with the CFS lite such as TPU.


Release the clasp of the external spool holder.


Place the external spool holder on the top cross bar with it pointing to the rear of the printer and then click the clasp closed.
CFS lite Setup
This next section covers the setup of the CFS lite and the connection to the Sparkx i7. For the setup you will need the CFS lite PTFE tubes, desiccants and the 6-pin 485 connection cable.

These parts are in the box that was removed from behind the printer.
First remove the tape and then the film from the front cover.

To open the cover, slide the white locking tab to the right and open. There are magnets holding the cover so it doesn’t fall open.

There is also a film on the inside of the front panel to be removed.
Next remove the tape from the rollers. While peeling the tape, hold the rollers in place so that they do not pop out. If the do pop out they can be snapped back into place.


Next the PTFE tubes are needed. The assembly has two tubes that are longer and two shorter. The long tubes are connected to the outer filament connections and the short to the inner filament connections.

The end of the tubes with the comb are connected to the four holes on top on the print head assembly. When the four tubes have been inserted. The remaining open slot on the comb is used to hold the cable that connects to the print head assembly.
The last part of the connection from the CFS lite to the Sparkx i7 is the 485 cable. Each plug has a locking latch that can be used to correct orientate the connections.

First plug the right angle connection into the back of the CFS lite.

Plug the straight plug into the left side of the printer. This is located near the USB connection.

The Sparkx i7 is now physically setup and ready to be setup for your first print.
First Power On
These next steps will go over the software setup in the printer for the first power on. At this time the Sparkx i7 can be moved to where you plan to use the printer. When moving the printer disconnect the 485 cable and the PTFE assembly from the printer.

Once it is in place, plug the power cable into the printer and the wall and flip the power switch.


When the power is on the screen will cycle through different splash screens.

The first screen will be the language. The options are either Chinese or English. Once selected, tap next.

Next is a screen to make sure the orange brackets has been removed from the printer.

Next there is a reminder to remove obstruction from the print bed. The bed needs to be cleared for the calibration later on in the setup.

Next agree to the privacy policy.

Next the printer can be connected to Wi-Fi for remote printing and to receive software updates.

Once the Wi-Fi connection has been made tap next.

After the Wi-Fi is connected you can select to bind the printer to your Creality account or skip this option.
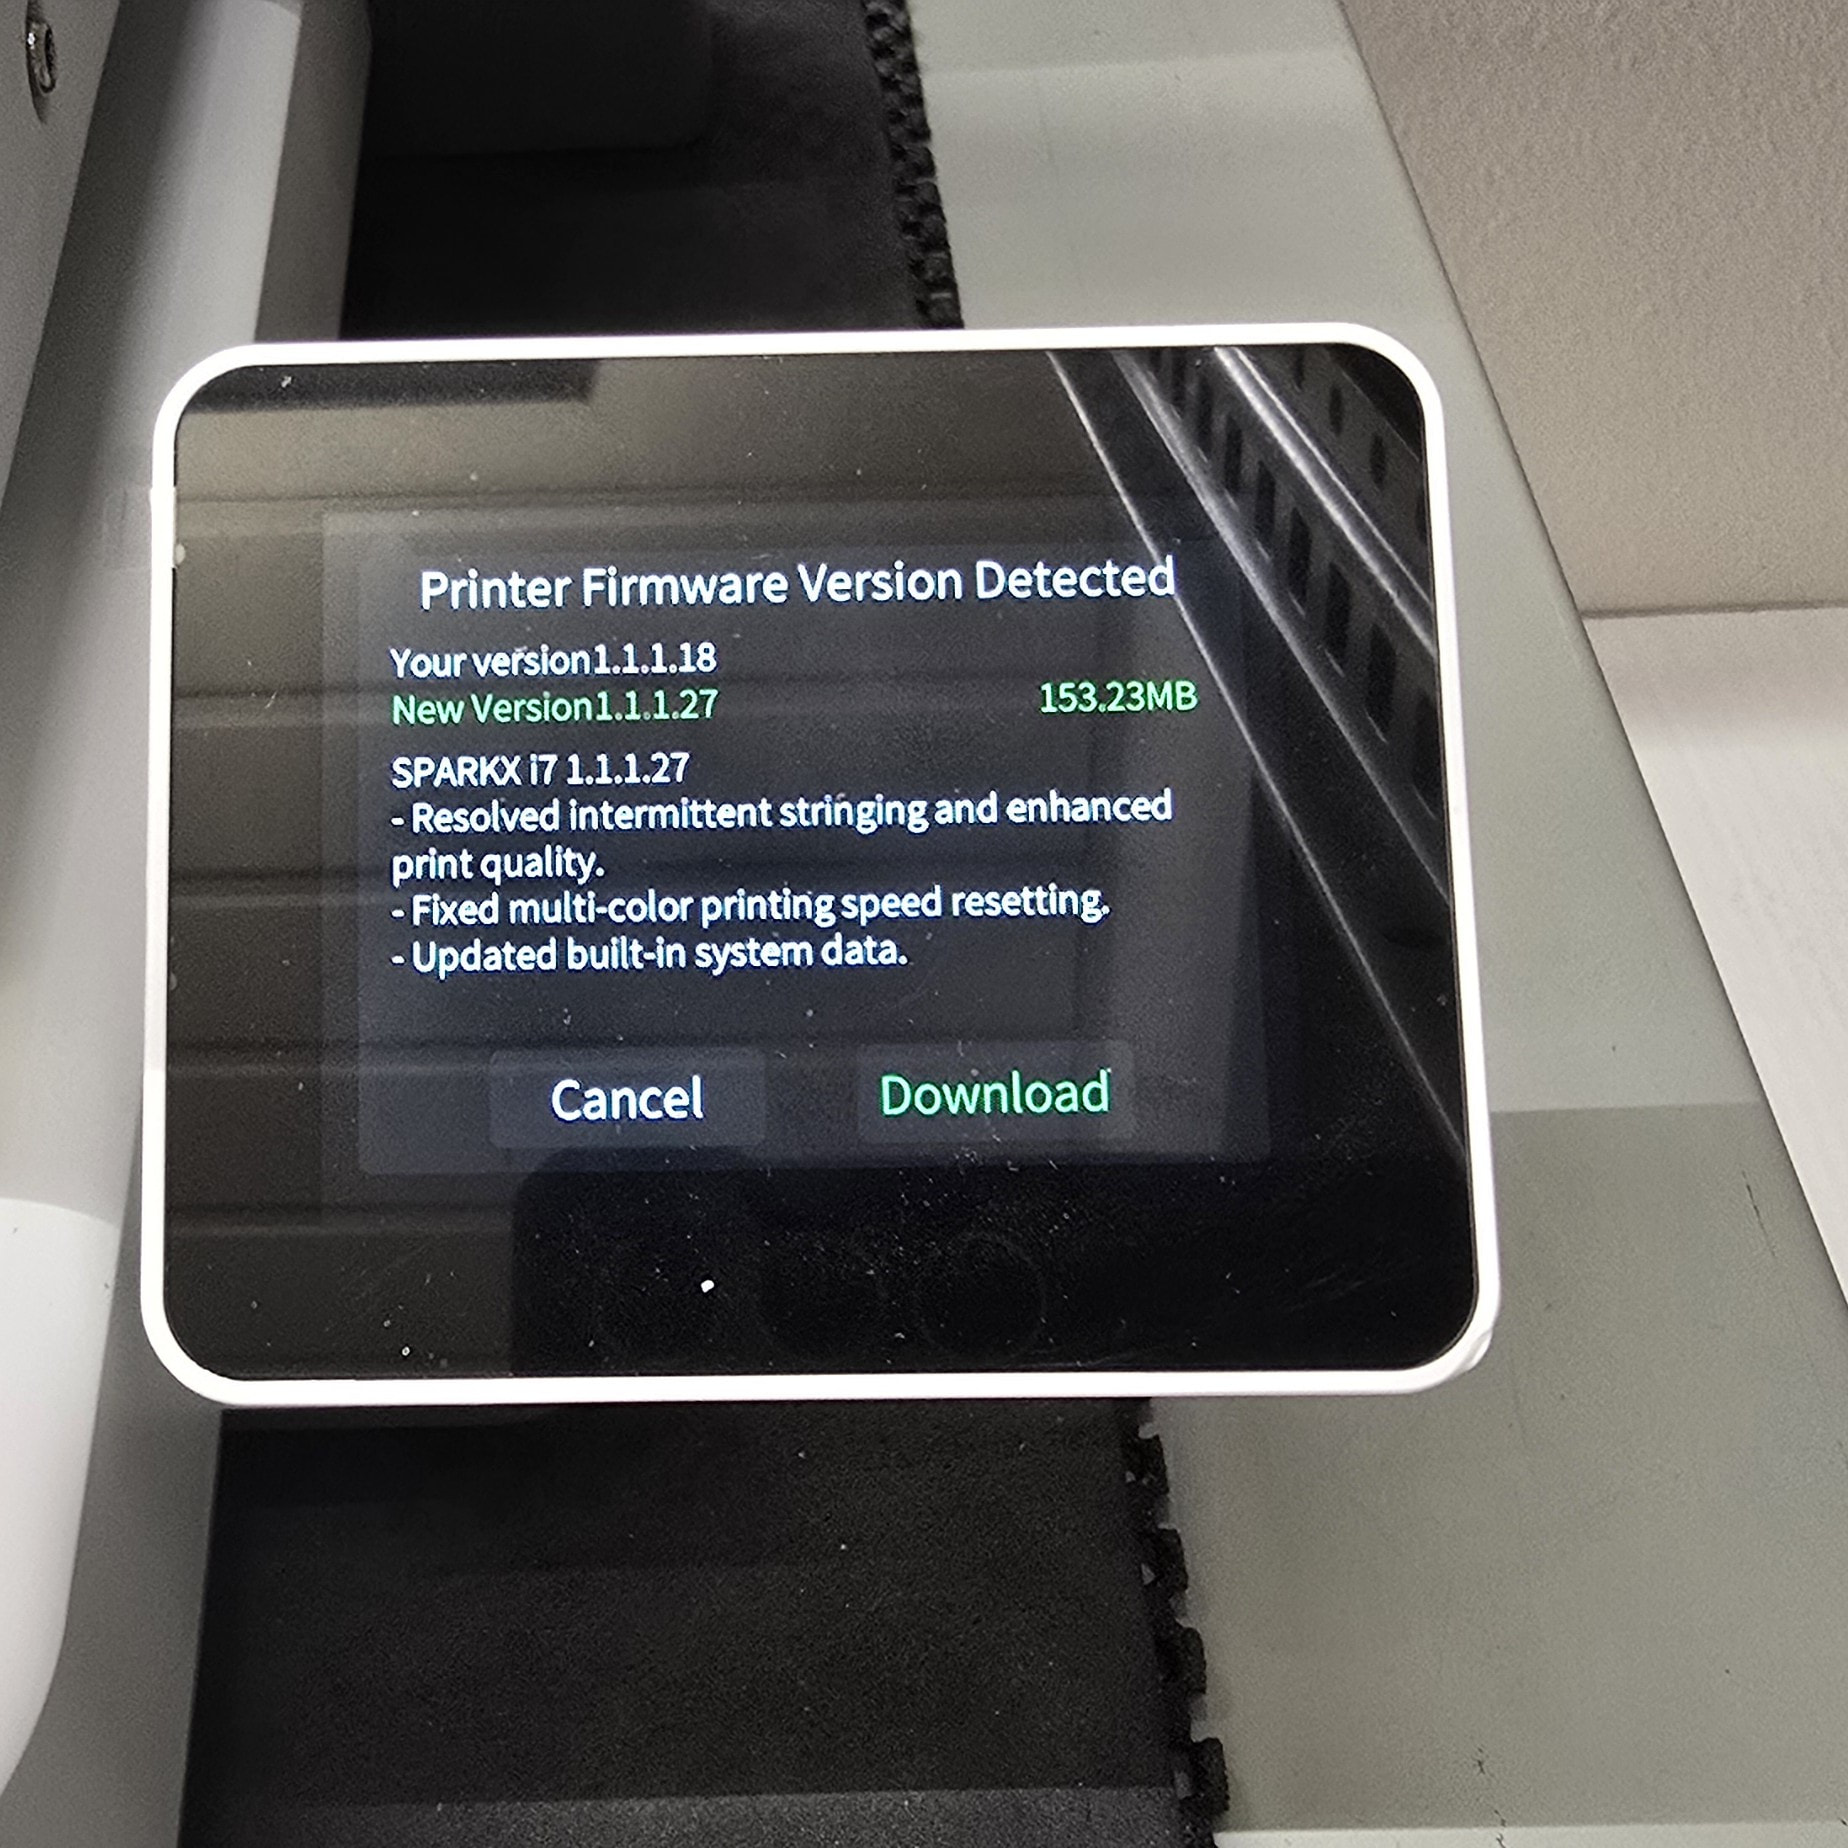
Next the printer will check to see if there is new firmware available. If download is selected, it will download the update and install it. This will take some time to complete.

After the update has been installed, you will be prompted to do a bed leveling calibration.

I recommend selecting all of the settings for calibration after any update have been installed. The calibration will take about 12 minutes to run.

After the update has completed, the Sparkx i7 is ready to start printing.
Loading the filament

To load the filament into the CFS lite, insert the filament into the openings located at the top.
Additional Things
Adding Desiccant to the CFS lite

Included with the Sparkx i7 are four sealed bags that each contain 2 desiccant bags. Two of them will be needed to fill the spots in the CFS lite.

The CFS lite has four spot for the desiccant to be added. They are located on the rear interior of the CFS lite.
Spool Holder PTFE Tube

The additional PTFE tube is to connect the spool holder to the print head assembly. Insert one end into the spool holder connection.

When not in use, the spool holder has a clip to store the PTFE tube.