
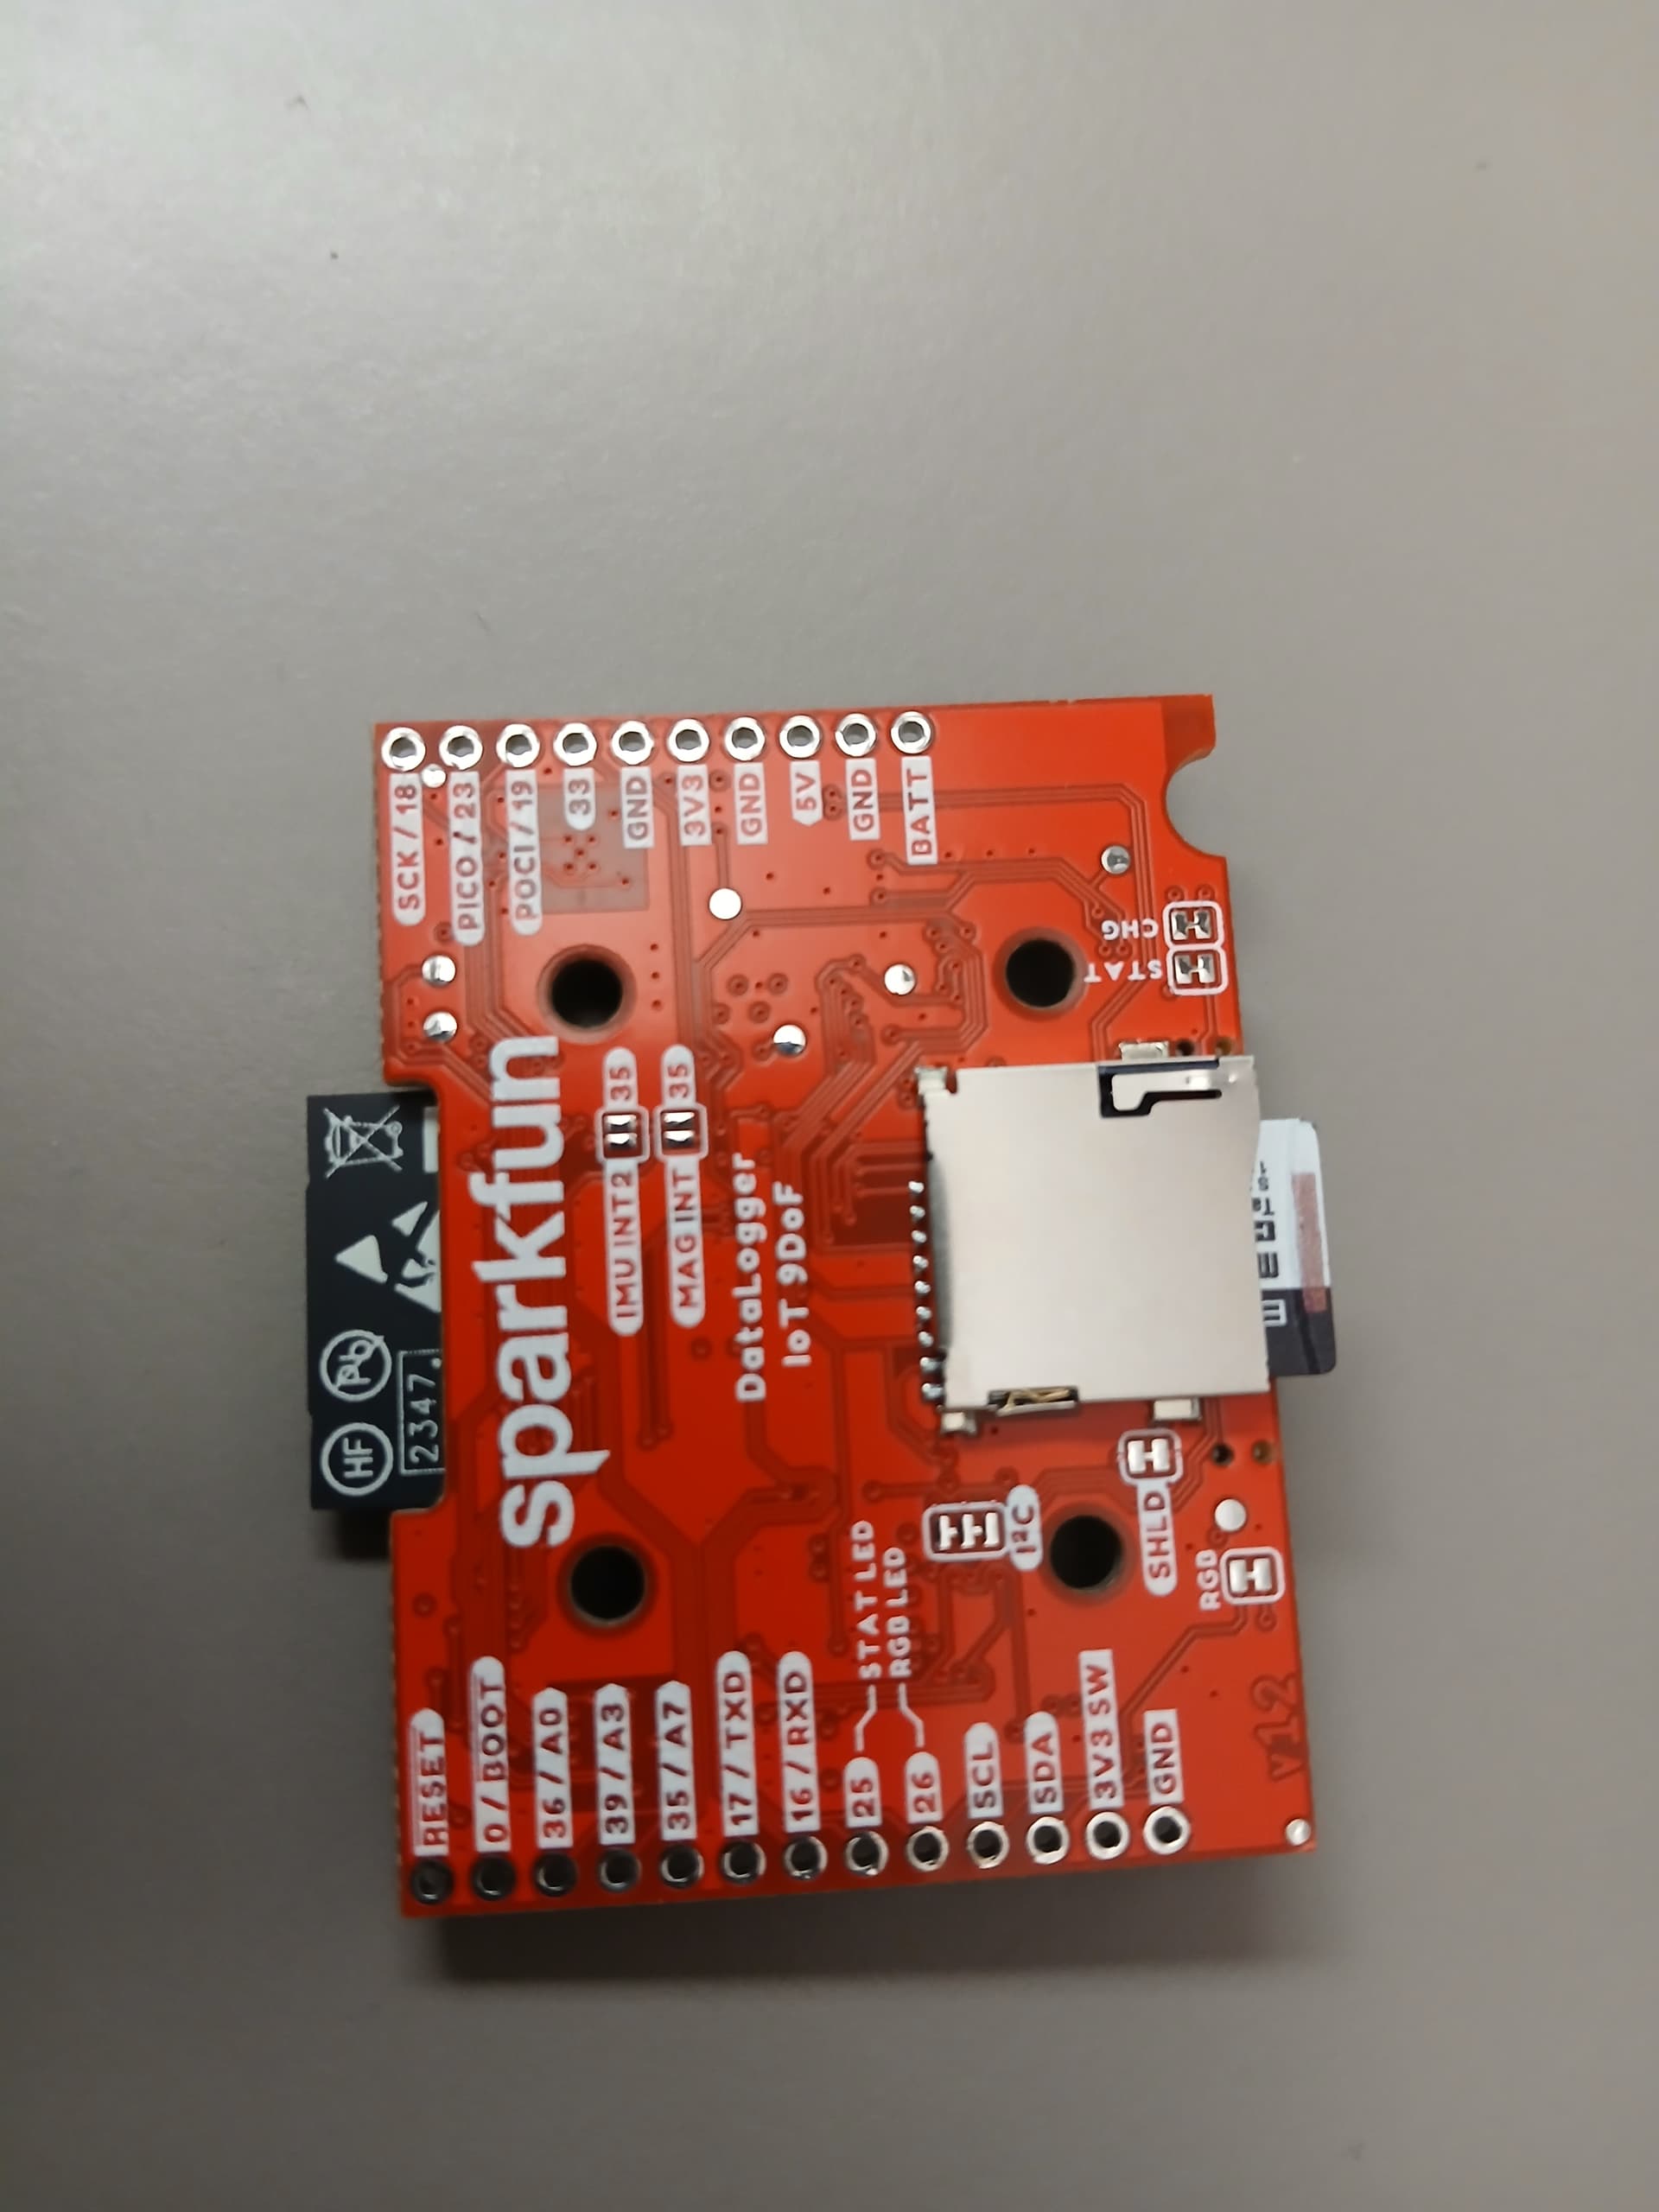
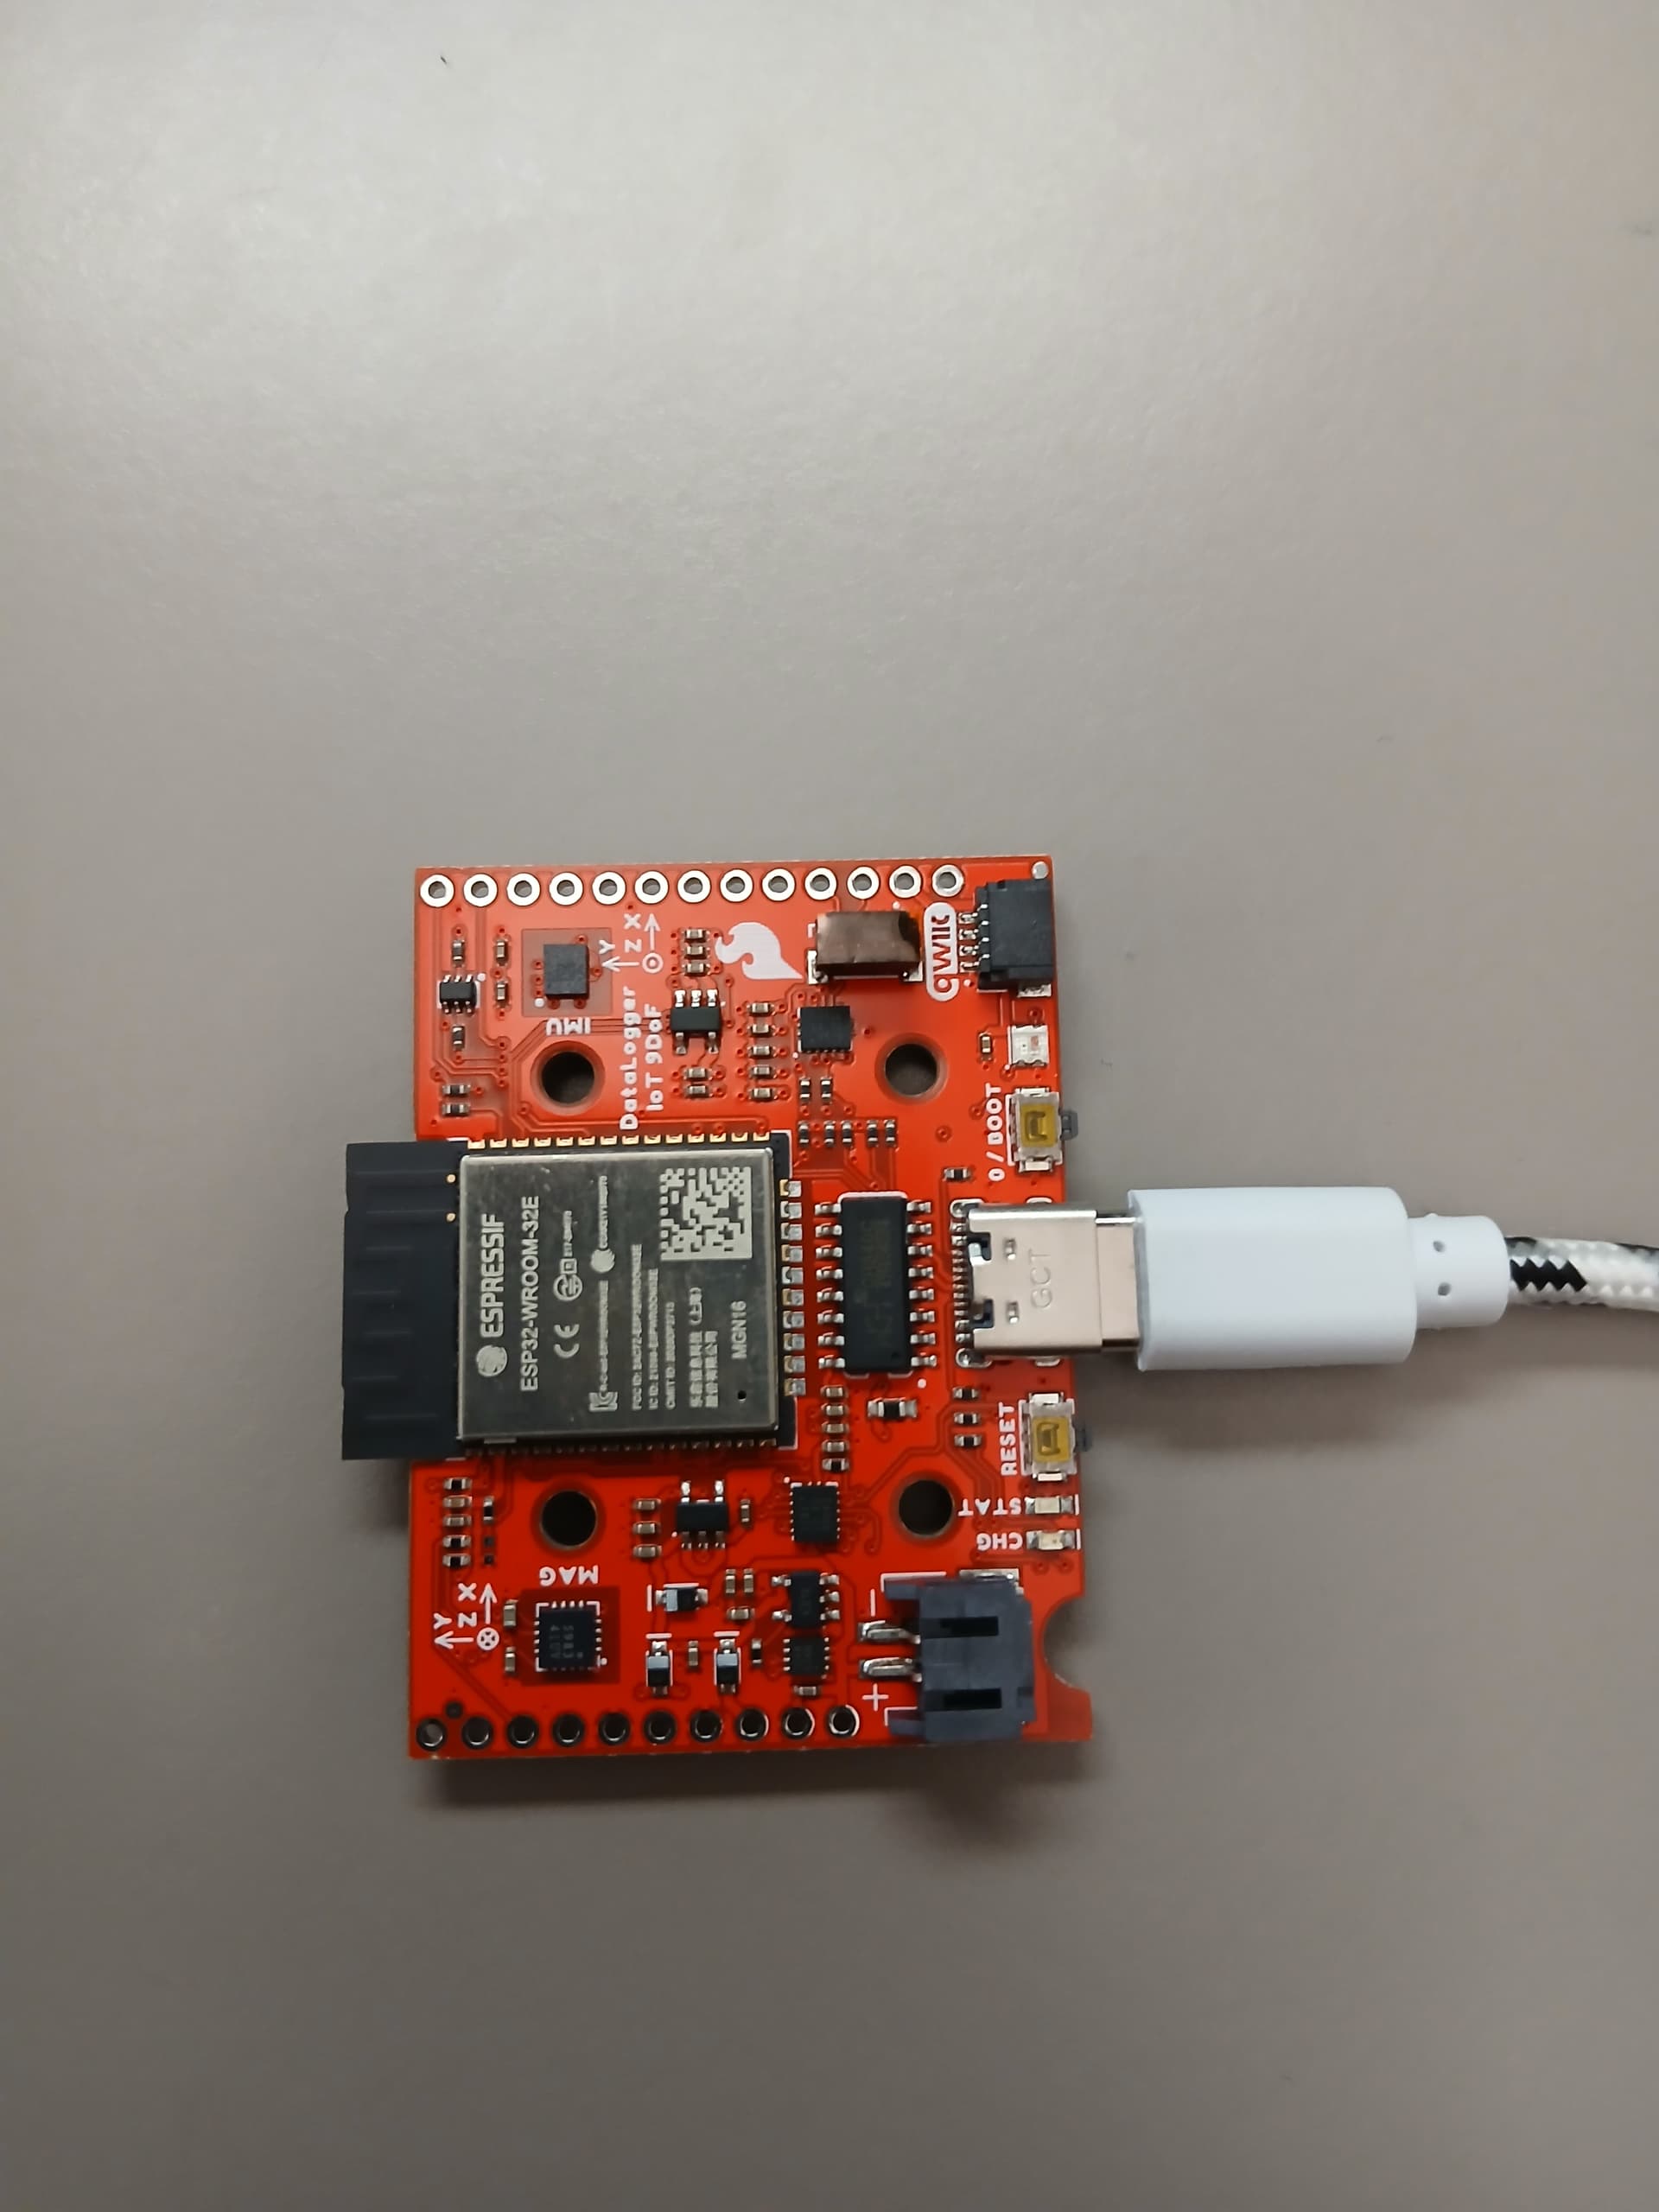
un versatil registrador de datos portátil y liviano que se puede utilizar en muchas aplicaciones (IoT). Este registrador de datos ya viene programado con el “firmware” que permite registrar la data de los sensores internos de la plataforma en la tarjeta SD removible interna. Este SparkFun DataLogger IoT - 9DoF tiene un microprocesador ESP32-WROOM-32E-N4 Espressif Systems Xtensa dual-core 32-bit LX6, también un MAX17048 medidor de micro corriente para las baterias lithium-ion (Li+), un acelerómetro/giroscopio combo ST ISM330 y un Sensor Magnético de 3-axis de alta cálidad. Este portátil SparkFun DataLogger IoT - 9DoF permite automáticamente registrar la data de muchos artefactos via Qwiic using these cables. La data se puede registrar con un sello de fecha y tiempo sicronizado a diferentes opciones como NTP, GNSS, ó RTC. Este artefacto puede operar con energía vía el puerto de USB ó con una bateria de Littium Ion. También el SparkFun DataLogger IoT - 9DoF puede enviar la data inalámbricamente (WiFi) a un servicio de las cosas de internet (IoT).
Configuración Inicial
Como una prueba inicial, primero se formatea una tarjeta SD en formato FAT32 en una computadora, luego se introduce en el SparkFun DataLogger IoT - 9DoF.
Simplemente se conecta al cable del puerto USB, entonces automáticamente comienza a registrar la data de sus sensores internos a la tarjeta SD.
Luego de algunos 20 a 30 segundos, se puede desconectar el cable de USB y se procede a remover la tarjeta SD la cual se puede leer en otra computadora. Aqui se muestra un ejemplo del archivo almacenado dentro de la tarjeta SD la cual fácilmente se puede leer desde una aplicación como Excel o otro editor,
| MAX17048.Voltage (V) | MAX17048.State Of Charge (%) | MAX17048.Change Rate (%/hr) | ISM330.Accel X (milli-g) | ISM330.Accel Y (milli-g) | ISM330.Accel Z (milli-g) | ISM330.Gyro X (milli-dps) | ISM330.Gyro Y (milli-dps) | ISM330.Gyro Z (milli-dps) | ISM330.Temperature (C) | MMC5983.X Field (Gauss) | MMC5983.Y Field (Gauss) | MMC5983.Z Field (Gauss) | MMC5983.Temperature (C) |
|---|---|---|---|---|---|---|---|---|---|---|---|---|---|
| 4.347 | 121.547 | -4.16 | -382.348 | 127.856 | 917.196 | 367.5 | 612.5 | 35 | 24.324 | 0.11554 | 0.05505 | 0.73462 | 26 |
| 4.349 | 121.547 | -4.16 | -370.392 | 124.684 | 922.564 | 122.5 | -385 | 122.5 | 24.605 | 0.10474 | 0.05817 | 0.73895 | 26 |
| 4.349 | 121.547 | -3.12 | -362.584 | 122.366 | 926.468 | 105 | -140 | 157.5 | 24.898 | 0.09882 | 0.0589 | 0.74225 | 27 |
| 4.35 | 121.547 | -3.12 | -356.728 | 120.78 | 928.786 | 70 | -402.5 | 192.5 | 25.172 | 0.09381 | 0.06018 | 0.74408 | 27 |
La tabla anterior muestra el voltaje, estado de carga, y rango de carga parámetros del MAX17048, la data XYZ del acelerómetro, la data XYZ del giroscopio del sensor ST ISM330, la data XYZ del sensor magnético MMC5983 y temperatura.
Configurar Registrador de Datos via Menu del Terminal (Frecuencia de muestreo)
Para configurar el SparkFun DataLogger IoT - 9DoF, este artefacto se conecta al cable de USB a la computadora. El programa minicom se puede utilizar para accesar los parámetros internos del SparkFun DataLogger IoT - 9DoF,
minicom -D /dev/ttyUSB0 -b 115200 -7
Luego se oprime el botón (RESET) localizado al lado del conector USB en la plataforma. El menú de configuración principal sale luego de oprimir ENTER en el terminal de minicom (Si el registrador de datos se deja sin oprimir ENTER, muestra la data registrada en el terminal dependiendo de la frecuencia de muestreo, si se necesita entrar al menú de configuración principal se oprime ENTRE en cualquier momento)
rst:0x1 (POWERON_RESET),boot:0x13 (SPI_FAST_FLASH_BOOT)
configsip: 0, SPIWP:0xee
clk_drv:0x00,q_drv:0x00,d_drv:0x00,cs0_drv:0x00,hd_drv:0x00,wp_drv:0x00
mode:DIO, clock div:1
load:0x3fff0030,len:1344
load:0x40078000,len:13924
ho 0 tail 12 room 4
load:0x40080400,len:3600
entry 0x400805f0

SparkFun DataLogger IoT - 9DoF   (c) 2023 SparkFun Electronics
Version: 01.00.04  - build 0000bb

Device ID: SFD1B805D422C930
Time: 1970-01-01T00:04:52
Uptime: 0 days, 00:04:52.666

Settings for: /SparkFun DataLogger IoT - 9DoF

         1)  Settings - System settings and operations
         2)  Devices Settings - Settings for connected devices

         x)  Exit

Select Option:
La frecuencia de muestreo se puede cambiar a 1 muestra por segundo, se escoge 1 en el menú - System settings and operations, entonces sale el siguiente menú
Settings for: /SparkFun DataLogger IoT - 9DoF/Settings


    General
         1)  Application Settings - Main Application Settings
         2)  Save Settings - Save, Restore and Reset System settings.
         3)  Time Sources - Manage time reference sources

    Network
         4)  WiFi Network - WiFi network connection for the system
         5)  NTP Client - NTP Time Sync Client

    Logging
         6)  Logger - Data logging action
         7)  Logging Timer - Set the internal between log entries
         8)  Data File - Output file rotation manager

    IoT Services
         9)  MQTT Client - A generic MQTT Client
        10)  MQTT Secure Client - A secure MQTT client
        11)  AWS IoT - Connect to an AWS Iot Thing
        12)  ThingSpeak MQTT - Connection to ThingSpeak
        13)  Azure IoT - Connection to Azure IoT
        14)  HTTP IoT - An HTTP IoT data connector
        15)  MachineChat - Connection to MachineChat

    Advanced
        16)  System Update - Device Reset and Firmware Update Options

         b)  Back
Se escoge bajo Logging Timer - Set the internal between log entries
Settings for: /SparkFun DataLogger IoT - 9DoF/Settings/Logging Timer

Settings:
         1)  Interval - The timer interval in milliseconds

         b)  Back
Selecciona 1 Interval - The timer interval in milliseconds y se entra 1000 ms = 1 second como se muestra a continuación,
Settings for: /SparkFun DataLogger IoT - 9DoF/Settings/Logging Timer/Interval

        Edit the value of `Interval` - data type <integer>

        When complete, press <Return> to accept, <ESC> to discard

        Interval = 1000

        [The value of Interval was updated]
Se navega hacia el menú principal selecionando b (the back option) y haciendolo hasta llegar al menú principal, y se oprime x para salir y grabar la configuración, entonces automaticamente comienza a registrar a 1 data por segundo como se muestra,
Settings for: /SparkFun DataLogger IoT - 9DoF

         1)  Settings - System settings and operations
         2)  Devices Settings - Settings for connected devices

         x)  Exit

Select Option: Exit


End Settings
[I] Saving System Settings.
4.350,121.074,322.608,-65.636,-60.024,1001.986,-105.000,-402.500,105.000,26.449,-0.41473,-0.01465,0.63361,30
4.351,121.074,322.608,-65.758,-60.146,1002.230,262.500,-70.000,175.000,26.484,-0.41473,-0.01477,0.63361,30
4.350,121.074,322.608,-66.124,-60.146,1002.352,140.000,-175.000,210.000,26.473,-0.41473,-0.01465,0.63379,30
4.350,121.074,322.608,-66.002,-60.024,1002.108,87.500,-262.500,192.500,26.473,-0.41492,-0.01471,0.63385,30
4.350,121.074,322.608,-66.002,-60.146,1002.596,192.500,-210.000,227.500,26.473,-0.41486,-0.01465,0.63379,30
4.351,121.074,322.608,-66.124,-60.024,1003.084,332.500,-192.500,192.500,26.508,-0.41382,-0.01404,0.63336,3
Otros parámetros configurables como se necesiten tales como los modos de dormir y despertar (Wake intervals, Sleep intervals), y el formato de la data almacenada en la tarjeta SD se pueden definir desde el terminal de forma similar a la mostrada anteriormente.
Configurar Registrador de Datos vía el Menú del Terminal (Connección al WiFi, NTP, Estampa del tiempo y fecha)
Para conectar el SparkFun DataLogger IoT - 9DoF al internet vía miniterm desde el menú principal selecciona 1) Settings - System settings and operations,
Settings for: /SparkFun DataLogger IoT - 9DoF

         1)  Settings - System settings and operations
         2)  Devices Settings - Settings for connected devices

         x)  Exit

Select Option:
entonces se selecciona 4 WiFi Network - WiFi network connection for the system en el próximo menú,
Settings for: /SparkFun DataLogger IoT - 9DoF/Settings


    General
         1)  Application Settings - Main Application Settings
         2)  Save Settings - Save, Restore and Reset System settings.
         3)  Time Sources - Manage time reference sources

    Network
         4)  WiFi Network - WiFi network connection for the system
         5)  NTP Client - NTP Time Sync Client

    Logging
         6)  Logger - Data logging action
         7)  Logging Timer - Set the internal between log entries
         8)  Data File - Output file rotation manager

    IoT Services
         9)  MQTT Client - A generic MQTT Client
        10)  MQTT Secure Client - A secure MQTT client
        11)  AWS IoT - Connect to an AWS Iot Thing
        12)  ThingSpeak MQTT - Connection to ThingSpeak
        13)  Azure IoT - Connection to Azure IoT
        14)  HTTP IoT - An HTTP IoT data connector
        15)  MachineChat - Connection to MachineChat

    Advanced
        16)  System Update - Device Reset and Firmware Update Options

         b)  Back

Select Option:
Hay que asegurarse que el WiFi Network connection in selection 1 este activado y entonces se procede a seleccionar 2 Network Name - The SSID of the WiFi network para configurar el nombre del WiFi Network y también seleccionar el 3 Password - The Password para connectar al WiFi network como se muestra,
Settings for: /SparkFun DataLogger IoT - 9DoF/Settings/WiFi Network

Settings:
         1)  Enabled - Enable or Disable the WiFi Network connection
         2)  Network Name - The SSID of the WiFi network
         3)  Password - The Password to connect to the WiFi network
         4)  Network 2 Name - Alternative network 2 SSID
         5)  Network 2 Password - Alternative network 2 Password
         6)  Network 3 Name - Alternative network 3 SSID
         7)  Network 3 Password - Alternative network 3 Password
         8)  Network 4 Name - Alternative network 4 SSID
         9)  Network 4 Password - Alternative network 4 Password

         b)  Back

Select Option:
Una vez la conneción del Network se completa, se selecciona 5 para activar el NTP desde el menú, se selecciona 3 Time Sources - Manage time reference sources, entonces se escoge 1 Reference Clock - The current reference clock source, luego se selecciona 2 NTP Client. Entonces se regresa al menú principal, se escoge 6 Logger - Data logging action, luego selecciona 1 Timestamp Mode - Enable timestamp output and set the format of a log entry timestamp, se selecciona el formato deseado para la estampa de la fecha y tiempo (timestamp) desde el menú (por ejemplo 5 el cual es formato Date Time). (Hay que mencionar que el server de NTP se puede también seleccionar en el menú)
Settings for: /SparkFun DataLogger IoT - 9DoF/Settings


    General
         1)  Application Settings - Main Application Settings
         2)  Save Settings - Save, Restore and Reset System settings.
         3)  Time Sources - Manage time reference sources

    Network
         4)  WiFi Network - WiFi network connection for the system
         5)  NTP Client - NTP Time Sync Client

    Logging
         6)  Logger - Data logging action
         7)  Logging Timer - Set the internal between log entries
         8)  Data File - Output file rotation manager

    IoT Services
         9)  MQTT Client - A generic MQTT Client
        10)  MQTT Secure Client - A secure MQTT client
        11)  AWS IoT - Connect to an AWS Iot Thing
        12)  ThingSpeak MQTT - Connection to ThingSpeak
        13)  Azure IoT - Connection to Azure IoT
        14)  HTTP IoT - An HTTP IoT data connector
        15)  MachineChat - Connection to MachineChat

    Advanced
        16)  System Update - Device Reset and Firmware Update Options

         b)  Back

Select Option:

Settings for: /SparkFun DataLogger IoT - 9DoF/Settings/Logger

Settings:
         1)  Timestamp Mode - Enable timestamp output and set the format of a log entry timestamp
         2)  Sample Numbering - An incremental count of the current log entry
         3)  Numbering Increment - Increment amount for Sample Numbering

    Output
         4)  SD Card Format - Enable and set the output format
         5)  Serial Console Format - Enable and set the output format

Functions:
         6)  Reset Sample Counter - Reset the sample number counter to the provided value

         b)  Back

Select Option:

Settings for: /SparkFun DataLogger IoT - 9DoF/Settings/Logger/Timestamp Mode

Current Value of `Timestamp Mode` =  0

Select from the following values:

         1)  No Timestamp = 0
         2)  Milliseconds since program start = 1
         3)  Seconds since Epoch = 2
         4)  Date Time - USA Date format = 3
         5)  Date Time = 4
         6)  ISO8601 Timestamp = 5
         7)  ISO8601 Timestamp with Time Zone = 6

         b)  Back

Select Option:
luego se retorna al menú principal selecionando cuantas veces sea necesario escogiendo b y luego x del menú principal para almacenar la configuración, ahora los eventos de registrados incluyen la fecha y el tiempo,
Settings for: /SparkFun DataLogger IoT - 9DoF

         1)  Settings - System settings and operations
         2)  Devices Settings - Settings for connected devices

         x)  Exit

Select Option: Exit

End Settings
[I] Saving System Settings.

General.Time,MAX17048.Voltage (V),MAX17048.State Of Charge (%),MAX17048.Change Rate (%/hr),ISM330.Accel X (milli-g),ISM330.Accel Y (milli-g),ISM330.Accel Z (milli-g),ISM330.Gyro X (milli-dps),ISM330.Gyro Y (milli-dps),ISM330.Gyro Z (mill)
07-10-2025 11:35:03,4.352,120.758,0.000,35.868,-10.858,1004.792,227.500,-122.500,192.500,27.922,-0.12402,0.38324,0.56531,30
07-10-2025 11:35:03,4.352,120.758,0.000,35.868,-10.736,1004.792,87.500,-175.000,175.000,27.867,-0.12085,0.38300,0.56128,30
07-10-2025 11:35:03,4.352,120.758,0.000,35.868,-10.614,1004.670,105.000,-122.500,227.500,27.875,-0.12201,0.38293,0.56195,30
07-10-2025 11:35:03,4.352,120.758,0.000,35.868,-10.858,1004.792,245.000,-70.000,227.500,27.867,-0.12354,0.38275,0.56415,30
07-10-2025 11:35:03,4.352,120.758,0.000,35.868,-10.614,1004.670,192.500,-52.500,227.500,27.902,-0.12439,0.38257,0.56555,30
07-10-2025 11:35:04,4.352,120.758,0.000,35.868,-10.736,1004.914,157.500,-122.500,245.000,27.875,-0.12439,0.38239,0.56592,30
07-10-2025 11:35:04,4.352,120.758,0.000,35.624,-10.736,1004.792,17.500,-280.000,227.500,27.891,-0.12469,0.38287,0.56641,31
07-10-2025 11:35:04,4.352,120.758,0.000,35.990,-10.736,1004.670,70.000,-157.500,105.000,27.859,-0.12476,0.38293,0.56543,31
07-10-2025 11:35:04,4.352,120.758,0.000,35.868,-10.858,1004.914,297.500,-70.000,210.000,27.852,-0.12445,0.38287,0.56592,31
07-10-2025 11:35:04,4.352,120.758,0.000,35.868,-10.858,1005.036,577.500,0.000,210.000,27.859,-0.12482,0.38226,0.56622,31
07-10-2025 11:35:05,4.352,120.758,0.000,36.356,-10.126,1004.426,192.500,0.000,245.000,27.844,-0.12469,0.38171,0.56628,31
07-10-2025 11:35:05,4.352,120.758,0.000,36.356,-10.126,1005.036,-140.000,-560.000,175.000,27.902,-0.12476,0.38177,0.56635,31

.................
Ahora el SparkFun DataLogger IoT - 9DoF graba la fecha, el tiempo correcto desde el servidor del tiempo en el internet correspondiente a cada evento.
Configurar el Registrador de Datos via el Menu del Terminal (Firmware upgrade)
A continuación se muestran los pasos en el menú para realizar un “firmware upgrade” del registrador de datos,
Settings for: /SparkFun DataLogger IoT - 9DoF/Settings


    General
         1)  Application Settings - Main Application Settings
         2)  Save Settings - Save, Restore and Reset System settings.
         3)  Time Sources - Manage time reference sources

    Network
         4)  WiFi Network - WiFi network connection for the system
         5)  NTP Client - NTP Time Sync Client

    Logging
         6)  Logger - Data logging action
         7)  Logging Timer - Set the internal between log entries
         8)  Data File - Output file rotation manager

    IoT Services
         9)  MQTT Client - A generic MQTT Client
        10)  MQTT Secure Client - A secure MQTT client
        11)  AWS IoT - Connect to an AWS Iot Thing
        12)  ThingSpeak MQTT - Connection to ThingSpeak
        13)  Azure IoT - Connection to Azure IoT
        14)  HTTP IoT - An HTTP IoT data connector
        15)  MachineChat - Connection to MachineChat

    Advanced
        16)  System Update - Device Reset and Firmware Update Options

         b)  Back

Select Option: 16


Settings for: /SparkFun DataLogger IoT - 9DoF/Settings/System Update


Functions:
         1)  Device Restart - Restart/reboot the device
         2)  Factory Reset - Erase all settings and revert to original firmware
         3)  Update Firmware - SD Card - Update the firmware from the SD card
         4)  Update Firmware - OTA - Update the firmware over-the-air

         b)  Back

Select Option: 4


Settings for: /SparkFun DataLogger IoT - 9DoF/Settings/System Update/Update Firmware - OTA

        Checking for an available firmware update .....

        Update firmware from version `01.00.04` to version `01.02.00` [Y/n]?

        Updating firmware... (100%)
[I] Firmware update completed successfully. Rebooting...
El SparkFun DataLogger IoT - 9DoF es un excelente portátil, fácil de configurar, registrador de datos (Data Logger) que puede utilizar en muchas aplicaciones de IoT.
Este artículo esta disponible en idioma inglés aquí.
This article also available in english language here.