Description
This project details configuring The Things Stack private LoRaWAN network server on a Dragino LPS8V2-US915 gateway, adding a Dragino LHT65N temperature/humidity sensor to the LoRaWAN network, accessing The Things Stack MQTT server and configuring Machinechat JEDI software to subscribe to the MQTT sensor data for data visualization / actioning. In this project, Machinechat JEDI Pro is running on a Seeed Odyssey x86 Mini PC but could be any instance of JEDI Pro.

Hardware
- Dragino LPS8V2-US915
The LPS8v2 is an open-source LoRaWAN Gateway that bridges a LoRa wireless network to an IP network via WiFi or Ethernet. - Dragino LHT65N-NE117-US915 Sensor
The Dragino LHT65N-NE117 Temperature & Humidity sensor is a Long Range LoRaWAN Sensor. It includes a built-in Temperature & Humidity sensor and has an external sensor connector to connect to an external Temperature Sensor. - Seeed Odyssey Blue x86 Mini PC
Quad Core Celeron J4105 Mini PC with 128GB external SSD
Software
- JEDI Pro
Applications software for IoT data collection, visualization, monitoring and data storage that can be integrated into IoT solutions. - The Things Stack
The Things Stack is an enterprise grade LoRaWAN network server, built on an open source core. The Things Stack allows you to build and manage LoRaWAN networks on your own hardware or in the cloud.
Background
LoRa is a long range, low power wireless technology developed by Semtech that utilizes a spread spectrum modulation technique derived from chirp spread spectrum (CSS) technology. LoRaWAN® is a standard for interoperability managed by the LoRa Alliance®. LoRa devices and the LoRaWAN standard provide many benefits and capabilities for wireless sensor network applications including long range, low power consumption and secure data transmission.
Several network operators offer cloud based LoRaWAN networks globally for customers to subscribe and connect to. Another option for customers is to setup up their own private, edge-based, LoRaWAN long-range IoT sensor network. Benefits of a private network include maintaining end-to-end privacy and control over data, control over software and infrastructure updates and upgrades, no requirement for Internet connectivity, and no recurring service/subscription network fees.
Implementation
For this project, LoRa hardware consists of Dragino’s indoor LPS8V2-US915 LoRaWAN gateway and LHT65N-NE177-US915 temperature / humidity sensor. Dragino’s LPS8V2 includes a built-in LoRaWAN Network Server, The Things Network - Stack (TTN-V3). Once the TTN LoRaWAN server is configured, the LHT65N sensor is added to the LoRaWAN network and an MQTT integration is set up to enable communication with other external systems.
For this project it is assumed Machinechat’s JEDI Pro IoT application software is installed and running on a Seeed Odyssey Mini-PC or similar device running Ubuntu LTS18.04 (if not installed refer to link on installing JEDI at https://support.machinechat.io/hc/en-us/articles/360056165753-Quick-Guide-to-Online-Resources ). For JEDI to receive data from MQTT, a custom data collector is added and the Sensor Dashboard configured to display the LoRa sensor data. A block diagram of the implemented private LoRaWAN IoT sensor network is shown below.

Set up Dragino LPS8V2 Gateway
1 - Power up the LPS8V2 and connect an ethernet cable to the router so LPS8V2 can obtain an IP address. In this project example ethernet is used to connect to the LPS8V2, for complete instructions and additional connection methods refer to LPS8v2 LoRaWAN Indoor Gateway User Manual.
2 - Determine IP address for LPS8V2 and use browser to login using user: “root” and password: “dragino”. This will bring up the System Overview page.

3 - Select LoRa for configuration settings. Set “Frequency Plan” to “US915 United States 915MHz (902-928)”, set “Frequency Sub Band” to “2: US915 , FSB2 (903.9-905.3)”, set “Mode” to “LoRaWAN Semtech UDP”.

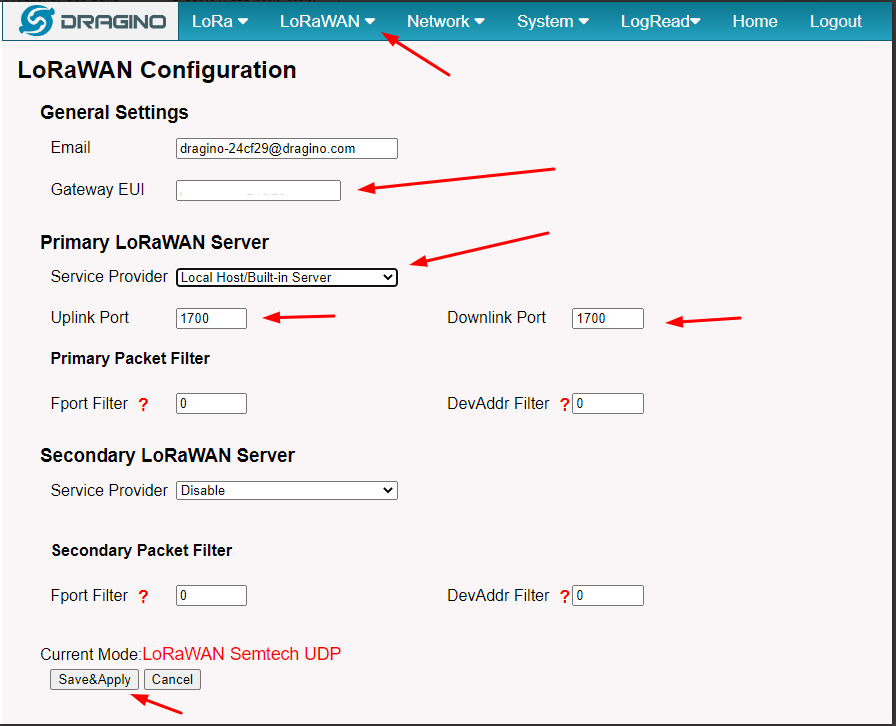
4 - Select LoRaWAN and select “LoRaWAN Semtech UDP” for configuration settings. Note assigned Gateway EUI. Set “Primary LoRaWAN Server” Service Provider to “Local Host/Built-in Server”, set set Uplink and Downlink Port to 1700 and select “Save&Apply” to save settings.
5 - Select Network for configuration settings. Set “Ethernet WAN Settings” Mode to “DHCP” and select “Save&Apply” to save settings.

Login to built-in Things Stack LoRaWAN server and add LHT65N sensor to LoRaWAN network.
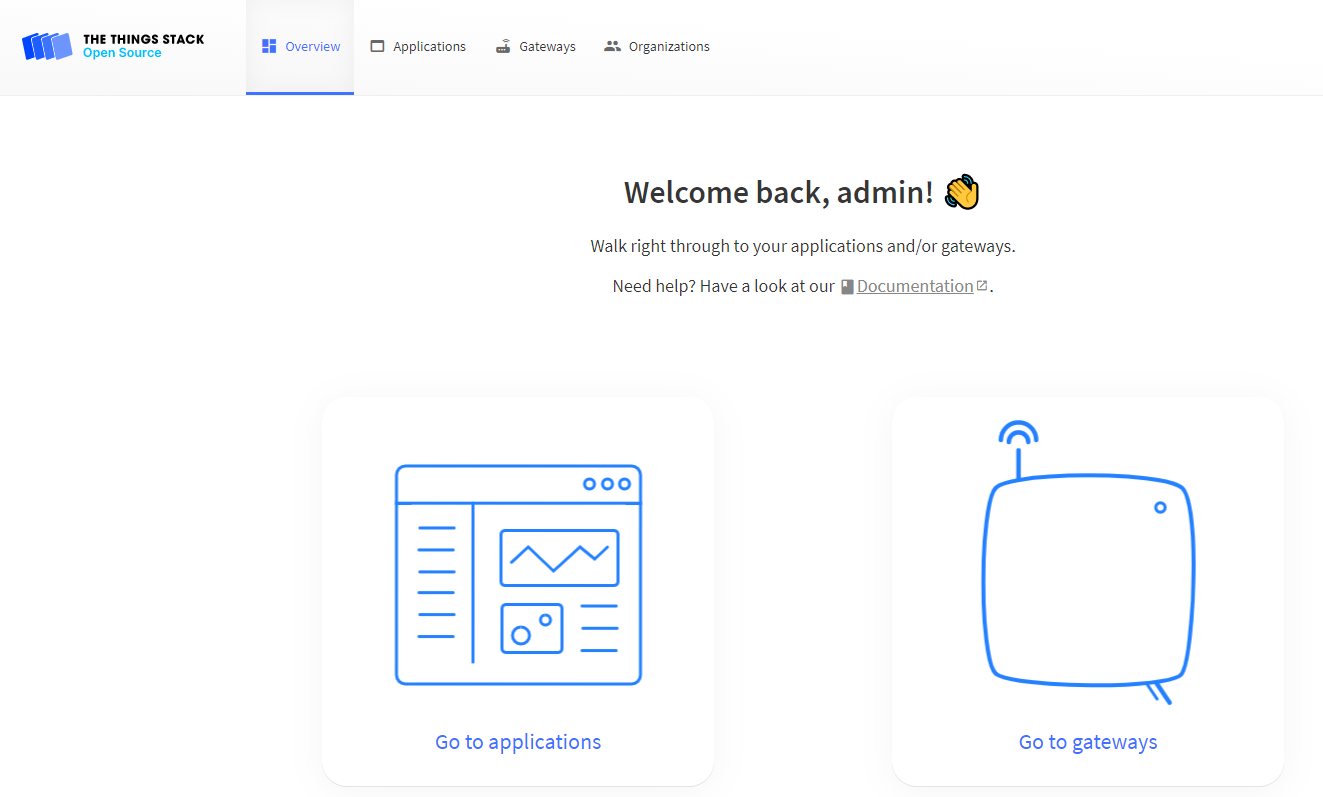
1 - Enter IP address of LPS8V2 with port “8080” in browser to access the Things Stack server (example: 192.168.1.5:8080). Login with user: “admin” and password: “dragino”.
2 - Create a device in The Things Stack using the LHT65N OTAA keys. Each LHT65N is shipped with a sticker providing its device EUI, APP Key and APP EUI as in below example.

First step is to create an Application if one wasn’t created previously. Enter Application ID and select “Create Application” to create. Optionally, Application name and Description can be entered for additional information/notes.

Select the Created Application ID (in this project example it is named “farm1”).

In the “farm1” Application select “+ Add End Device”.

In the Register end device screen Enter, select “From The LoRaWAN Device Registry” tab to enter device data.
In 1. Select the end device, for “Brand” enter Dragino, for “Model” enter LHT65, for “HardwareVer.” select 1.8, for “Profile” select US_902_928.
In 2. Enter registration data, for “Frequency plan” select United States 902-928 MHz FSB 2(used by TTN), from information on LHT65N label enter AppEUI, DevEUI, AppKey and then select “Register end device”.


3 - Activate LHT65N to join the LoRaWAN network pressing the ACT button for more than 3 seconds and it will auto-join to the Things Stack network.

Once the LHT65N has joined, it will start to upload sensor data to the Things Stack and user can see in the End device screen “Live Data”.

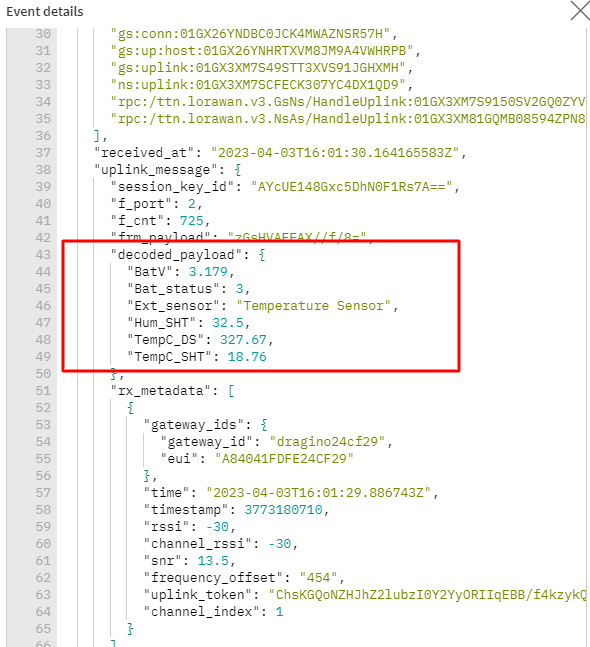
To view the data being received in the LoRa packet, a “Live Data” message can be opened and expanded to show the decoded LHT65N payload data.
Accessing The Things Stack MQTT Server
The Things Stack exposes an MQTT server to work with streaming events. The following steps describe how to connect an MQTT client and subscribe to uplinks or publish downlinks. Machinechat JEDI will need the MQTT server information in order to receive the streaming LHT65N sensor data. Detailed information on The Things Stack MQTT server can be found at https://www.thethingsindustries.com/docs/integrations/other-integrations/mqtt/ .
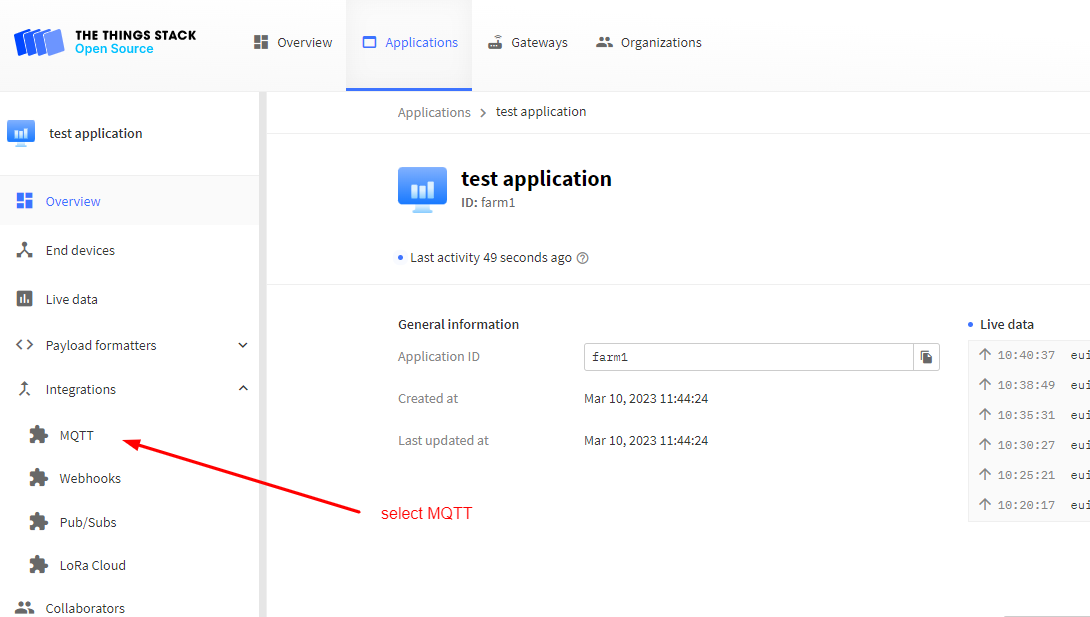
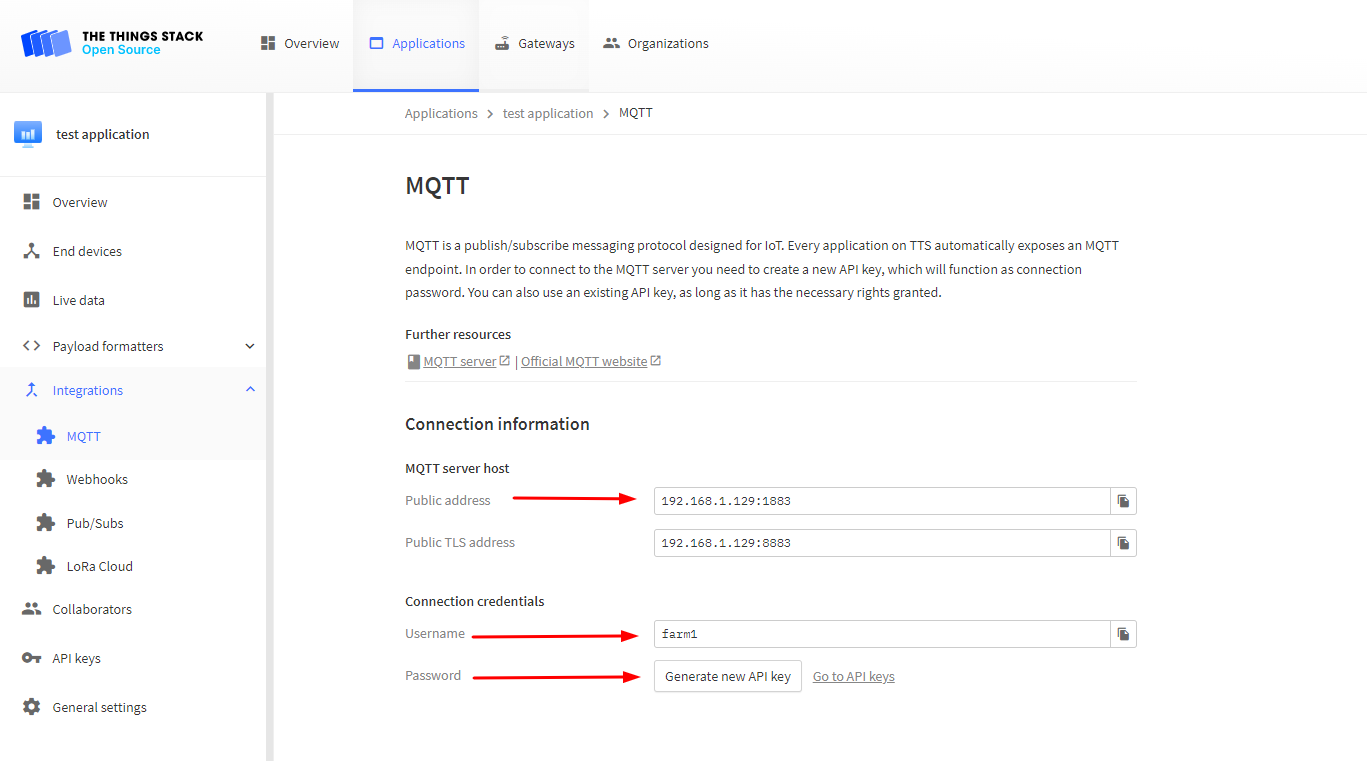
1 - Creating an API Key. In order to use the MQTT server a new API key needs to be generated to authenticate. The Console provides the required connection information and can be used to create an API key for authentication. In your Applications tab select the MQTT submenu from the Integrations side menu.
2 - Click on the Generate new API key button to generate an API key for use in connecting to the MQTT server. Make note of the MQTT info which is needed for the JEDI data collector configurayion file (Public address, Username, Password).

Setting up Machinechat JEDI Pro MQTT Custom Data Collector
A custom MQTT data collector will be set up on JEDI Pro to subscribe to the sensor data from the LHT65N LoRaWAN sensor. The data collector consists of two files, “dcollector.bin” is the executable file that is run on the machine running JEDI and “dconfig.yml” is the corresponding configuration file containing the pertinent MQTT and sensor info. For this project, the temperature and humidity values of the LHT65N will be subscribed to by editing dconfig.yml with the sensor parameter names. To determine the sensor parameter names, the LoRaWAN data payload for the LHT65N will be reviewed.
1 - Download the LoRaWAN MQTT data collector “dcollector.bin” and configuration file “dconfig.yml” from Machinechat at link https://support.machinechat.io/hc/en-us/articles/13935227926935-TTN-MQTT-LoRaWAN-Collector .
2 - Review the LHT65N LoRaWAN payload. As noted above, the payload contains the below data.

The temperature parameter is “TempC_SHT” and humidity parameter is “Hum_SHT”.
3 - The configuration file needs to be modified with the MQTT info and sensor data parameters. The values that need to be modified are:
mQTTBrokerFullURL: this is “Public Address” from above MQTT Integration
mQTTUsername: this is “Username” from above MQTT Integration
mQTTPassword: this is “Password” from above MQTT Integration
cSproperty: this is parameter subscribed to in the LoRa payload
mcProperty: this is the corresponding parameter name mapped in JEDI
Example dconfig.yml file
mQTTBrokerFullURL: "tcp://192.168.1.129:1883"
mQTTUsername: "farm1"
mQTTPassword: "NNSXS.XFQCW3GFJXGC78MPOVKF3M2CUD4HFNSHNZQLRJQ.MB5VAGIGLVQ3F66LFYK2CVY2Z66A4CWRLQJXRIQBNT1A8IH7C6TA"
sendTestSenML: true
# setDebugLevel 0 is no debug, 1 is colorized JSON decode, 2 is 1 plus verbose payload dumps
setDebugLevel: 1
propertyNames:
  - cSproperty: "TempC_SHT"
    mcProperty: "TempC_SHT"
  - cSproperty: "Hum_SHT"
    mcProperty: "Hum_SHT"
4 - Install the data collector “dcollector.bin” and configuration “dconfig.yml” files by copying them to the “jedi/plugins” directory of the machine where JEDI is installed.
5 - Test the data collector by running “./dcollector.bin ./dconfig.yml” on the command line in the jedi/plugins directory. Below is example output data on the terminal when the data collector is working correctly (debug level set to 1).
scottr@scottr-ODYSSEY-X86J4105:~$ cd jedi/plugins
scottr@scottr-ODYSSEY-X86J4105:~/jedi/plugins$ ./dcollector.bin ./dconfig.yml
Connected to tcp://192.168.1.129:1883
metric:id=Test, n=Test, vs=Test, u=-
*** Pretty unmarshalled message:
{
    "correlation_ids": [
        "as:up:01GY7S902M665RW2B45YC9BDNW",
        "gs:conn:01GY68GPXXS36ZZECE9NPW6DXJ",
        "gs:up:host:01GY68GQ4VKK3YG4W92C0QS0J8",
        "gs:uplink:01GY7S8ZT69EZ6QNMV8J6632VA",
        "ns:uplink:01GY7S8ZTDRFWTDVKF7V7EKHZ5",
        "rpc:/ttn.lorawan.v3.GsNs/HandleUplink:01GY7S8ZTB47Q1N0SDWVD1JGNZ",
        "rpc:/ttn.lorawan.v3.NsAs/HandleUplink:01GY7S902G65R016DJCCWQ83AG"
    ],
    "end_device_ids": {
        "application_ids": {
            "application_id": "farm1"
        },
        "dev_addr": "009C9B95",
        "dev_eui": "A84041F1B186136D",
        "device_id": "eui-a840410000000100",
        "join_eui": "A840410000000100"
    },
    "received_at": "2023-04-17T14:18:06.804334437Z",
    "uplink_message": {
        "consumed_airtime": "0.061696s",
        "decoded_payload": {
            "BatV": 3.158,
            "Bat_status": 3,
            "Ext_sensor": "Temperature Sensor",
            "Hum_SHT": 44.1,
            "TempC_DS": 327.67,
            "TempC_SHT": 17.91
        },
        "f_cnt": 1728,
        "f_port": 2,
        "frm_payload": "zFYG/wG5AX//f/8=",
        "network_ids": {
            "net_id": "000000"
        },
        "received_at": "2023-04-17T14:18:06.541471260Z",
        "rx_metadata": [
            {
                "channel_index": 4,
                "channel_rssi": -29,
                "frequency_offset": "483",
                "gateway_ids": {
                    "eui": "A84041FDFE24CF29",
                    "gateway_id": "dragino24cf29"
                },
                "rssi": -29,
                "snr": 13.8,
                "time": "2023-04-17T14:18:06.530178Z",
                "timestamp": 3895295244,
                "uplink_token": "ChsKGQoNZHJhZ2lubzI0Y2YyORIIqEBB/f4kzykQjPq1wQ4aDAieqvWhBhDE36n9ASDg7cGNr80MKgwInqr1oQYQ0L/n/AE="
            }
        ],
        "session_key_id": "AYcUE148Gxc5DhN0F1Rs7A==",
        "settings": {
            "coding_rate": "4/5",
            "data_rate": {
                "lora": {
                    "bandwidth": 125000,
                    "spreading_factor": 7
                }
            },
            "frequency": "904700000",
            "time": "2023-04-17T14:18:06.530178Z",
            "timestamp": 3895295244
        },
        "version_ids": {
            "band_id": "US_902_928",
            "brand_id": "dragino",
            "firmware_version": "1.8",
            "hardware_version": "_unknown_hw_version_",
            "model_id": "lht65"
        }
    }
}
***


*** Flattened Object:
{
    "BatV": 3.158,
    "Bat_status": 3,
    "Ext_sensor": "Temperature Sensor",
    "Hum_SHT": 44.1,
    "TempC_DS": 327.67,
    "TempC_SHT": 17.91
}
***


*** Node name: A84041F1B186136D ***

metric:id=A84041F1B186136D, n=TempF, vd=64.24, u=-
metric:id=A84041F1B186136D, n=Hum_SHT, vd=44.1, u=-
metric:id=A84041F1B186136D, n=TempC_DS, vd=327.67, u=-
5 - Open JEDI and navigate to “Settings” and then select “Data Collectors”. Click on “Add Collector” to add new data collector.

6 - Add new data collector. Enter data collector name, select “Custom Plug-in” for type, select “dcollector.bin” for Plug-in Executable, add dconfig.yml file location for Plug-in Options, select “Run As Background Process and Monitor”, click on "“VALIDATE PLUG IN” and then select “SAVE” to save settings.

Displaying LHT65N LoRa sensor data on JEDI Pro
In JEDI, navigate to “Data Dashboard” and create new charts for LHT65N temperature and humidity. Example dashboard is shown below.

Conclusion
The combination of Machinechat’s JEDI Pro applications software, The Things Stack LoRaWAN network server, and Dragino’s LPS8V2 gateway provide a very capable and cost-effective private LoRaWAN IoT wireless sensor network without any requirement for a cloud connection.
References
- Dragino - LPS8v2 Indoor LoRaWAN Gateway
- Dragino - LPS8v2 LoRaWAN Indoor Gateway User Manual
- Dragino - LHT65S-NE117 LoRaWAN Temperature & Humidity Sensor
- Dragino - LHT65N LoRaWAN Temperature & Humidity Sensor Manual
- Getting Started with machinechat’s JEDI One IoT Platform
- Machinechat - Building a private, edge-based LoRaWAN IoT sensor network