Here is a demo of a Raspberry Pico 2W using the C SDK that combines two of our previous articles, one of them is the R-Pico 2 W Wireless Access Point (Controlling IoT LED) and the other one is the Analog Devices DS18B20 1-Wire Temperature Sensors C codes to create a simple IoT application via the Raspberry Pico 2 W C-SDK. Both were integrated and the modifications were essentially at this section of the previous C-code of the R-Pico 2 W Wireless Access Point (Controlling IoT LED) article,
#define LED_TEST_BODY "<html><body><h1>Hello from Pico.</h1><p>Led is %s</p><p><a href=\"?led=%d\">Turn led %s</a></body></html>"
#define LED_PARAM "led=%d"
This defines the HTML file that will be presented to the user via the WiFi Access Point provided by the Raspberry Pico 2 W. These were changed to display and accommodate the 3 Analog Devices DS18B20 temperature sensors on the breadboard shown in the previous article. In the main.c file of the R-Pico 2 W Wireless Access Point (Controlling IoT LED) article the following section was modified,
static int test_server_content(const char *request, const char *params, char *result, size_t max_result_len) {
    int len = 0;
    if (strncmp(request, LED_TEST, sizeof(LED_TEST) - 1) == 0) {
        // Get the state of the led
        bool value;
        cyw43_gpio_get(&cyw43_state, LED_GPIO, &value);
        int led_state = value;

        // See if the user changed it
        if (params) {
            int led_param = sscanf(params, LED_PARAM, &led_state);
            if (led_param == 1) {
                if (led_state) {
                    // Turn led on
                    cyw43_gpio_set(&cyw43_state, LED_GPIO, true);
                } else {
                    // Turn led off
                    cyw43_gpio_set(&cyw43_state, LED_GPIO, false);
                }
            }
        }
        // Generate result
        if (led_state) {
            len = snprintf(result, max_result_len, LED_TEST_BODY, "ON", 0, "OFF");
        } else {
            len = snprintf(result, max_result_len, LED_TEST_BODY, "OFF", 1, "ON");
        }
    }
    return len;
}
Specifically it was modified where it generates the result to the user.
len = snprintf(result, max_result_len, LED_TEST_BODY, "ON", 0, "OFF");
Here is the picture of the breadboard used showing the 3 Analog Devices DS18B20 temperature sensors
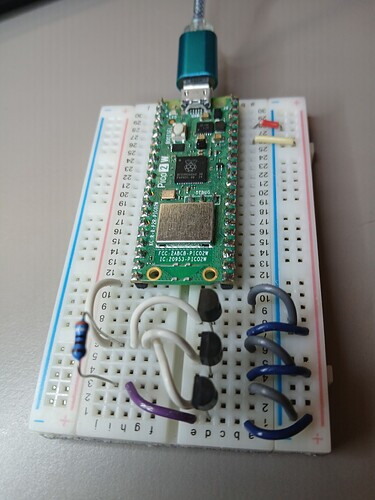
The breadboard was placed in the exterior and powered via a USB battery to measure the temperature outside. The Raspberry Pico 2 W provides on demand temperature readings via direct Wireless Access Point to a cellular phone web browser. Here is the snapshot of a cellular phone accessing the wireless access point via the 1-Wire bus 3 Analog Devices DS18B20 temperature sensors.

The temperature has dramatically changed from around 11F at 12 am to this level around 2 pm which is delta of about +35F. The Raspberry Pico 2 W is an excellent platform for developing these types of IoT applications. Also the Analog Devices DS18B20 temperature sensors are a great way for measuring temperatures in many applications. Both are available at DigiKey.
Have a great day!
This article is also available in spanish here.
Este artículo está disponible en español aquí.