Description
This project details setting up a private LoRaWAN IoT sensor network using off the shelf hardware and software. Software consists of Machinechat’s JEDI Pro SSE (Seeed Studio Edition) applications software and the ChirpStack LoRaWAN network server application. Hardware consists of Seeed’s Odyssey x86 Mini PC, a SenseCAP outdoor LoRaWAN gateway and two outdoor SenseCAP environmental sensors.

The Machinechat and ChirpStack applications are installed on the Odyssey Mini PC running Ubuntu Linux and there is no cloud element needed for the private LoRaWAN sensor network implementation.
Hardware
- Seeed Odyssey Blue x86 Mini PC
Quad Core Celeron J4105 Mini PC with 128GB external SSD - Seeed SenseCAP Outdoor Gateway - LoRaWAN US915MHz
SenseCAP LoRaWAN Gateway is based on LoRaWAN® protocol, applicable for low-power, long-distance environmental data collection and monitoring. - Seeed SenseCAP Wireless Air Temperature and Humidity Sensor - LoRaWAN US915MHz
SenseCAP Wireless Air Temperature and Humidity Sensor is battery powered and measures atmospheric temperature and humidity in an IP66 enclosure. - SenseCAP Wireless Light Intensity Sensor - LoRaWAN US915MHz
SenseCAP Wireless Light Intensity Sensor is battery powered and measures ambient intensity of light in an IP66 enclosure.
Software
- JEDI Pro SSE
Applications software for IoT data collection, visualization, monitoring and data storage that can be integrated into IoT solutions. - ChirpStack
The ChirpStack open-source LoRaWAN Network Server stack provides open-source components for LoRaWAN networks. The modular architecture makes it possible to integrate within existing infrastructures. - Ubuntu LTS18.04.6
Secure enterprise Linux for servers, desktops, clouds, developers and things. Version - Ubuntu 18.04. 6 LTS (Long-Term Support)
Background
LoRa is a long range, low power wireless technology developed by Semtech that utilizes a spread spectrum modulation technique derived from chirp spread spectrum (CSS) technology. LoRaWAN® is a standard for interoperability managed by the LoRa Alliance®. LoRa devices and the LoRaWAN standard provide many benefits and capabilities for wireless sensor network applications including long range, low power consumption and secure data transmission.
Several network operators offer cloud based LoRaWAN networks globally for customers to subscribe and connect to. Another option for customers is to setup up their own private, edge-based, LoRaWAN long-range IoT sensor network. Benefits of a private network include maintaining end-to-end privacy and control over data, control over software and infrastructure updates and upgrades, no requirement for Internet connectivity, and no recurring service/subscription network fees.
Implementation
For this project, LoRa hardware consists of Seeed’s outdoor LoRaWAN gateway and two of their battery powered outdoor sensors. Server hardware consists of Seeed’s Odyssey Mini-PC running Ubuntu LTS18.04. Machinechat’s JEDI Pro SSE software and the ChirpStack network server are installed on the Odyssey Mini-PC. The LoRaWAN gateway and Ubuntu server are both connected to the same ethernet network. A block diagram of the implemented private LoRaWAN IoT sensor network is shown below.
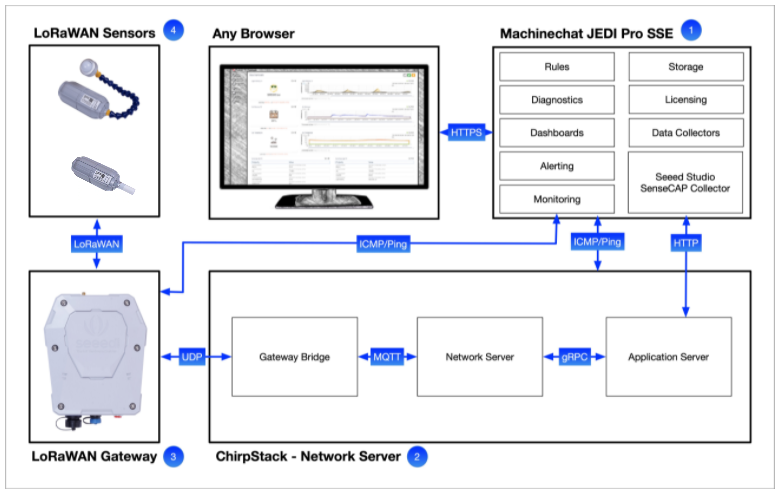
The elements of the network are:
- JEDI Pro SSE - JEDI Pro SSE applications software enables the collection of sensor data and ability to act on it through dashboards, rules, actions, notifications, and network monitoring and is installed on the Ubuntu server. JEDI Pro SSE has a built-in data collector that communicates seamlessly with the ChirpStack network server to receive LoRaWAN data from Seeed’s SenseCAP sensors.
- ChirpStack Network Server - ChirpStack is an open-source LoRaWAN network server installed on the Ubuntu server that gathers sensor data forwarded from the SenseCAP gateway. ChirpStack deduplicates, decrypts and converts the data into a common data format and makes it available via integrations including MQTT and HTTP. ChirpStack also provides a web-based interface to quickly onboard and manage devices and gateways..
- LoRaWAN Gateway - LoRaWAN gateways gathers wireless information from network devices like sensors and forwards to the network server software using IP networking such as ethernet. Seeed Studio’s SenseCAP Outdoor Gateway features an IP66 enclosure and supports an extended operating temperature range.
- LoRaWAN Sensors - Seeed Studio’s SenseCAP line of LoRaWAN sensors have a built-in battery that lasts up to 3 years (using the default configuration that sends messages once per hour). In this project, a humidity/temperature sensor and light intensity sensor are utilized.
Set up Ubuntu server hardware
1 - If not already installed, download and install Ubuntu LTS18.04.6 See download link
note: for ODYSSEY - X86J4105 Mini-PC installation info see Creating Bootable USB and Installing OS (Ubuntu Desktop 18.04)
Set up ChirpStack LoRaWAN network server
ChirpStack provides detailed instructions and background information for downloading, installing and setting up the ChirpStack network server https://www.chirpstack.io/project/guides/debian-ubuntu/. Below is a walkthrough of the steps I followed when setting up ChirpStack on the Odyssey Mini-PC Ubuntu server.
1 - Install dependencies (Mosquitto MQTT broker, Redis database, PostgreSQL database)
Use the package manager apt to install these dependencies:
sudo apt install mosquitto mosquitto-clients redis-server redis-tools postgresql
2 - Configure Mosquitto for initial testing by turning off security and allowing anonymous users. Once system is up and running, MQTT security will be enabled in below step Securing the MQTT Communications.
Create a file called “chirpstack.conf ” with the following contents:
listener 1883
allow_anonymous true
Save the created file in the below directory:
/etc/mosquitto/conf.d
Now, reboot the server:
sudo shutdown -r now
3 - Setup PostgreSQL databases and users
Enter the command line utility for PostgreSQL:
sudo -u postgres psql
Inside this prompt, execute the following queries to set up the databases that are used by the ChirpStack stack components. It is recommended to change the usernames and passwords. Remember to use the new username and password values when updating the chirpstack-network-server.toml and chirpstack-application-server.toml configuration files.
Set up the users and the passwords
create role chirpstack_as with login password 'dbpassword';
create role chirpstack_ns with login password 'dbpassword';
Create the databases for the servers
create database chirpstack_as with owner chirpstack_as;
create database chirpstack_ns with owner chirpstack_ns;
Change to the ChirpStack Application Server database
\c chirpstack_as
Enable the pq_trgm and hstore extensions
create extension pg_trgm;
create extension hstore;
Exit psql
\q
4 - Setup ChirpStack software repository
Make sure that both dirmngr and apt-transport-https are installed:
sudo apt install apt-transport-https dirmngr
Set up the key for this new repository:
sudo apt-key adv --keyserver keyserver.ubuntu.com --recv-keys 1CE2AFD36DBCCA00
(note: above keyserver did not work for me so I used below)
sudo apt-key adv --keyserver hkp://keyserver.ubuntu.com:80 --recv-keys 1CE2AFD36DBCCA00
Add the repository to the repository list by creating a new file:
sudo echo "deb https://artifacts.chirpstack.io/packages/3.x/deb stable main" | sudo tee /etc/apt/sources.list.d/chirpstack.list
Update the apt package cache:
sudo apt update
5 - Install ChirpStack Gateway Bridge
Install the package using apt:
sudo apt install chirpstack-gateway-bridge
The ChirpStack gateway bridge configuration file is located at /etc/chirpstack-gateway-bridge/chirpstack-gateway-bridge.toml . The default configuration is sufficient for this project.
Start the ChirpStack Gateway Bridge service:
sudo systemctl start chirpstack-gateway-bridge
Set the ChirpStack Gateway Bridge service to start on boot:
sudo systemctl enable chirpstack-gateway-bridge
6 - Installing the ChirpStack Network Server
Install the package using apt:
sudo apt install chirpstack-network-server
The ChirpStack network server configuration file is located at /etc/chirpstack-network-server/chirpstack-network-server.toml and must be updated to match the database and band configuration. See below example for US915 that was used for this project. Addition information and examples can be found at Installing the ChirpStack Network Server . (note: The chirpstack-network-server.toml file is based on the US version chirpstack-network-server-us915.toml file located in directory /etc/chirpstack-network-server/examples and modified per below)
After updating the configuration, you need to restart the ChirpStack Network Server and validate that there are no errors.
Start the ChirpStack Network Server service:
sudo systemctl start chirpstack-network-server
Set the ChirpStack Network Server service to start on boot:
sudo systemctl enable chirpstack-network-server
Print the ChirpStack Network Server log-output to check for errors:
sudo journalctl -f -n 100 -u chirpstack-network-server
US915 configuration example sub-band 2 (125kHz channels 8 - 15 & 500kHz channel 65)
[general]
log_level=4

[postgresql]
dsn="postgres://chirpstack_ns:dbpassword@localhost/chirpstack_ns?sslmode=disable"

[network_server]
net_id="000000"

[network_server.band]
name="US_902_928"

[network_server.network_settings]
enabled_uplink_channels=[8, 9, 10, 11, 12, 13, 14, 15, 65]
7 - Installing the ChirpStack Application Server
Install the package using apt:
sudo apt install chirpstack-application-server
The ChirpStack application server configuration file is located at /etc/chirpstack-application-server/chirpstack-application-server.toml and must be updated to match the database configuration. Below is a configuration example which matches the database created in one of the previous steps.
[general]
log_level=4

[postgresql]
dsn="postgres://chirpstack_as:dbpassword@localhost/chirpstack_as?sslmode=disable"

[application_server.integration] marshaler="json"

[application_server.external_api]
jwt_secret="verysecret"
Note: you must replace the jwt_secret with a secure secret!
You could use the below command to generate a random secret
openssl rand -base64 32
Start the ChirpStack Application Server service:
sudo systemctl start chirpstack-application-server
Set the ChirpStack Application Server service to start on boot:
sudo systemctl enable chirpstack-application-server
Print the ChirpStack Application Server log-output to check for errors:
sudo journalctl -f -n 100 -u chirpstack-application-server
Securing the MQTT communications
The ChirpStack Network Server and Application Server does not handle MQTT authentication and authorization as this is the responsibility of the MQTT broker. For this project, Mosquitto is the MQTT broker and a basic level of security is to set up usernames and passwords (this is described in detail in MQTT authentication & authorization - ChirpStack open-source LoRaWAN<sup>®</sup> Network Server).
1 - Setting up passwords
Using the mosquitto_passwd command, it is possible to create a password file for authentication. Below is an example to create a password file and add an username (use the -c only the first time as it will create a new file):
*Create a password file, with users chirpstack_gw, chirpstack_ns, and chirpstack_as
sudo mosquitto_passwd -c /etc/mosquitto/passwd chirpstack_gw
sudo mosquitto_passwd /etc/mosquitto/passwd chirpstack_ns
sudo mosquitto_passwd /etc/mosquitto/passwd chirpstack_as
Secure the password file
sudo chmod 600 /etc/mosquitto/passwd
2 - Setting up ACLs (access control list file)
The access control list file will map usernames to a set of topics. Write this file to /etc/mosquitto/acls . See below example:
user chirpstack_gw
topic write gateway/+/event/+
topic read gateway/+/command/+

user chirpstack_ns
topic read gateway/+/event/+
topic write gateway/+/command/+

user chirpstack_as
topic write application/+/device/+/event/+
topic read application/+/device/+/command/+
3 - Mosquitto configuration
Add a new configuration file called /etc/mosquitto/conf.d/auth.conf with the following configuration:
allow_anonymous false
password_file /etc/mosquitto/passwd
acl_file /etc/mosquitto/acls
4 - Update ChirpStack configuration files
Edit the three ChirpStack configuration files /etc/chirpstack-gateway-bridge/chirpstack-gateway-bridge.toml , /etc/chirpstack-network-server/chirpstack-network-server.toml , and /etc/chirpstack-application-server/chirpstack-application-server.toml to add the new credentials:
Example for chirpstack-application-server.toml
[application_server.integration.mqtt]

# Connect with the given username (optional)
username="chirpstack_as"

# Connect with the given password (optional)
password="your_password"
Connect to and Configure the SenseCAP LoRaWAN Gateway
Log into the SenseCAP gateway
Find the IP address of the gateway and then go to ipadress:8000. Default user is “sensecap” and password is “sensecap!!!”

Set up LoRa Configuration
Go to the “LoRa” tab on the dashboard and set the “Packet Dispatch Configuration” to point to the IP address of the Ubuntu server running ChirpStack. Uplink and Downlink ports default to 1700 so leave settings at 1700. Configure it like the picture below but changing IP address to the ChirpStack server.

Adding the SenseCAP LoRa Gateway to ChirpStack
Detailed information on adding a gateway to ChirpStack is at Connecting a gateway to ChirpStack
1 - Login to the ChirpStack GUI
Use the IP address of the ChirpStack server and port 8080 to get to login screen:
Example: http://192.168.1.23:8080

(note: default credentials are Username: admin Password: admin )
2 - Add Network Server

2 - Create Organization
Name Organization and check “Gateways” box

3 - Create Service Profile
Name Service Profile and check box

4 - Create Gateway
Name Gateway, enter Gateway ID and select Network Server
(note: Gateway ID is EUI: from SenseCAP Gateway label)

5 - Create Device Profile
Name Device Profile and select values shown for this setup

6 - Edit CODEC in Device Profile
Edit CODEC to use CODEC from machinechat article Seeed SenseCAP LoRaWAN ChirpStack CODEC

Adding SenseCAP LoRa Sensors to ChirpStack
1 - Create Application
Name Application and select Service Profile shown for this setup

2 - Add Device (SenseCAP Sensor)
Adding end devices requires entering the EUI (printed on the product label) and the app key which has to be retrieved online; see section 4.1 of https://sensecap-docs.seeed.cc/pdf/Guide-for-SenseCAP-Adaption-to-3rd-Party-Gateways-Servers-V1.2.pdf .

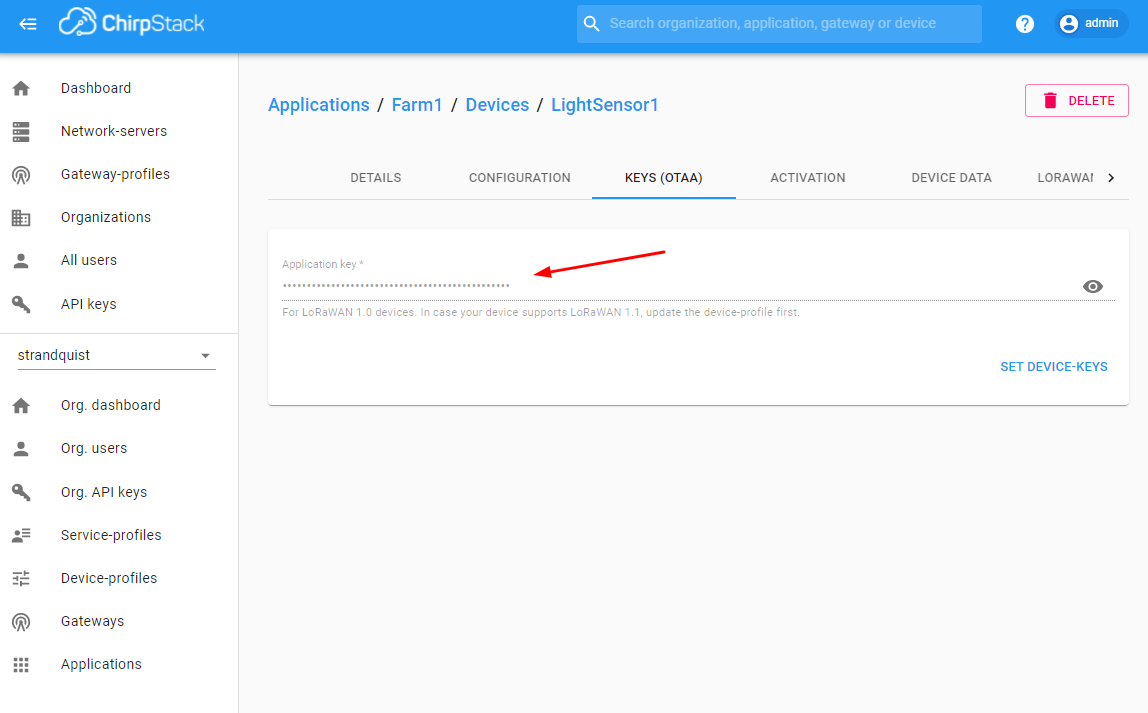
Create Device in ChirpStack

Add Application key for Device
Enable HTTP Integration for JEDI Pro SSE in ChirpStack
Select “Add” in HTTP Integration tab in ChirpStack Integrations
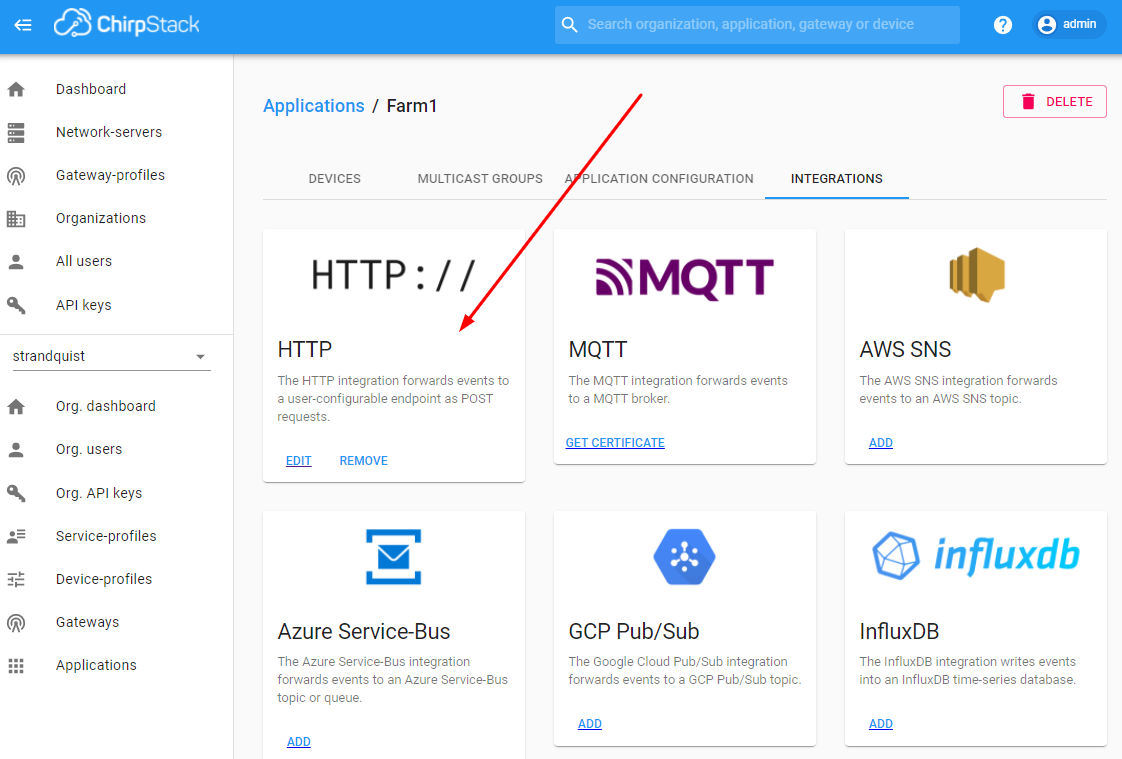
Set the marshaller to “JSON” and the endpoint to the IP address of the machine where JEDI Pro SSE is running, i.e., “http://192.168.1.101:8090”. Make sure the port number (8090 in this example) is the same within the ChirpStack HTTP Integration and the JEDI Pro SSE data collector configuration. It should be a unique, unused port number (not 80, 8080, etc.)

Set up JEDI Pro SSE Data Collector

Displaying SenseCAP LoRa sensor data on JEDI Pro SSE
Example Data Dashboard for Temperature/Humidity and Light Intensity SenseCAP sensors

Conclusion
The combination of Machinechat’s JEDI Pro SSE applications software, ChirpStack LoRaWAN network server, and Seeed’s SenseCAP LoRa hardware result in a powerful edge-based IoT wireless sensor network without any requirement for a cloud connection or internet connectivity.
References
- Seeed - Odyssey Blue J4105 Mini PC
- Seeed - SenseCAP Outdoor Gateway - LoRaWAN US915MHz
- Seeed - SenseCAP Wireless Light Intensity Sensor - LoRaWAN US915MHz
- Seeed - SenseCAP Wireless Air Temperature and Humidity Sensor - LoRaWAN US915MHz
- Seeed - Guide for SenseCAP Adaption to 3rd Party Gateways Servers
- Getting Started with machinechat’s JEDI One IoT Platform
- Machinechat - Building a private, edge-based LoRaWAN IoT sensor network